When you have a webshop it is of course important that you can organize your administrative process well. In this manual we describe which settings you can find where. We discuss order management, invoice management, quotation management and the return process.
1. Workflow Settings
The settings to set up the administrative process can be found under "Starting point > My Webshop > Settings > Ordering Process & Stock > Workflow".
Here you can set up the following:
Orders
Under the tab 'Orders' you can make the changes that apply to the workflow regarding orders. Here you can make changes based on the order number and status settings.
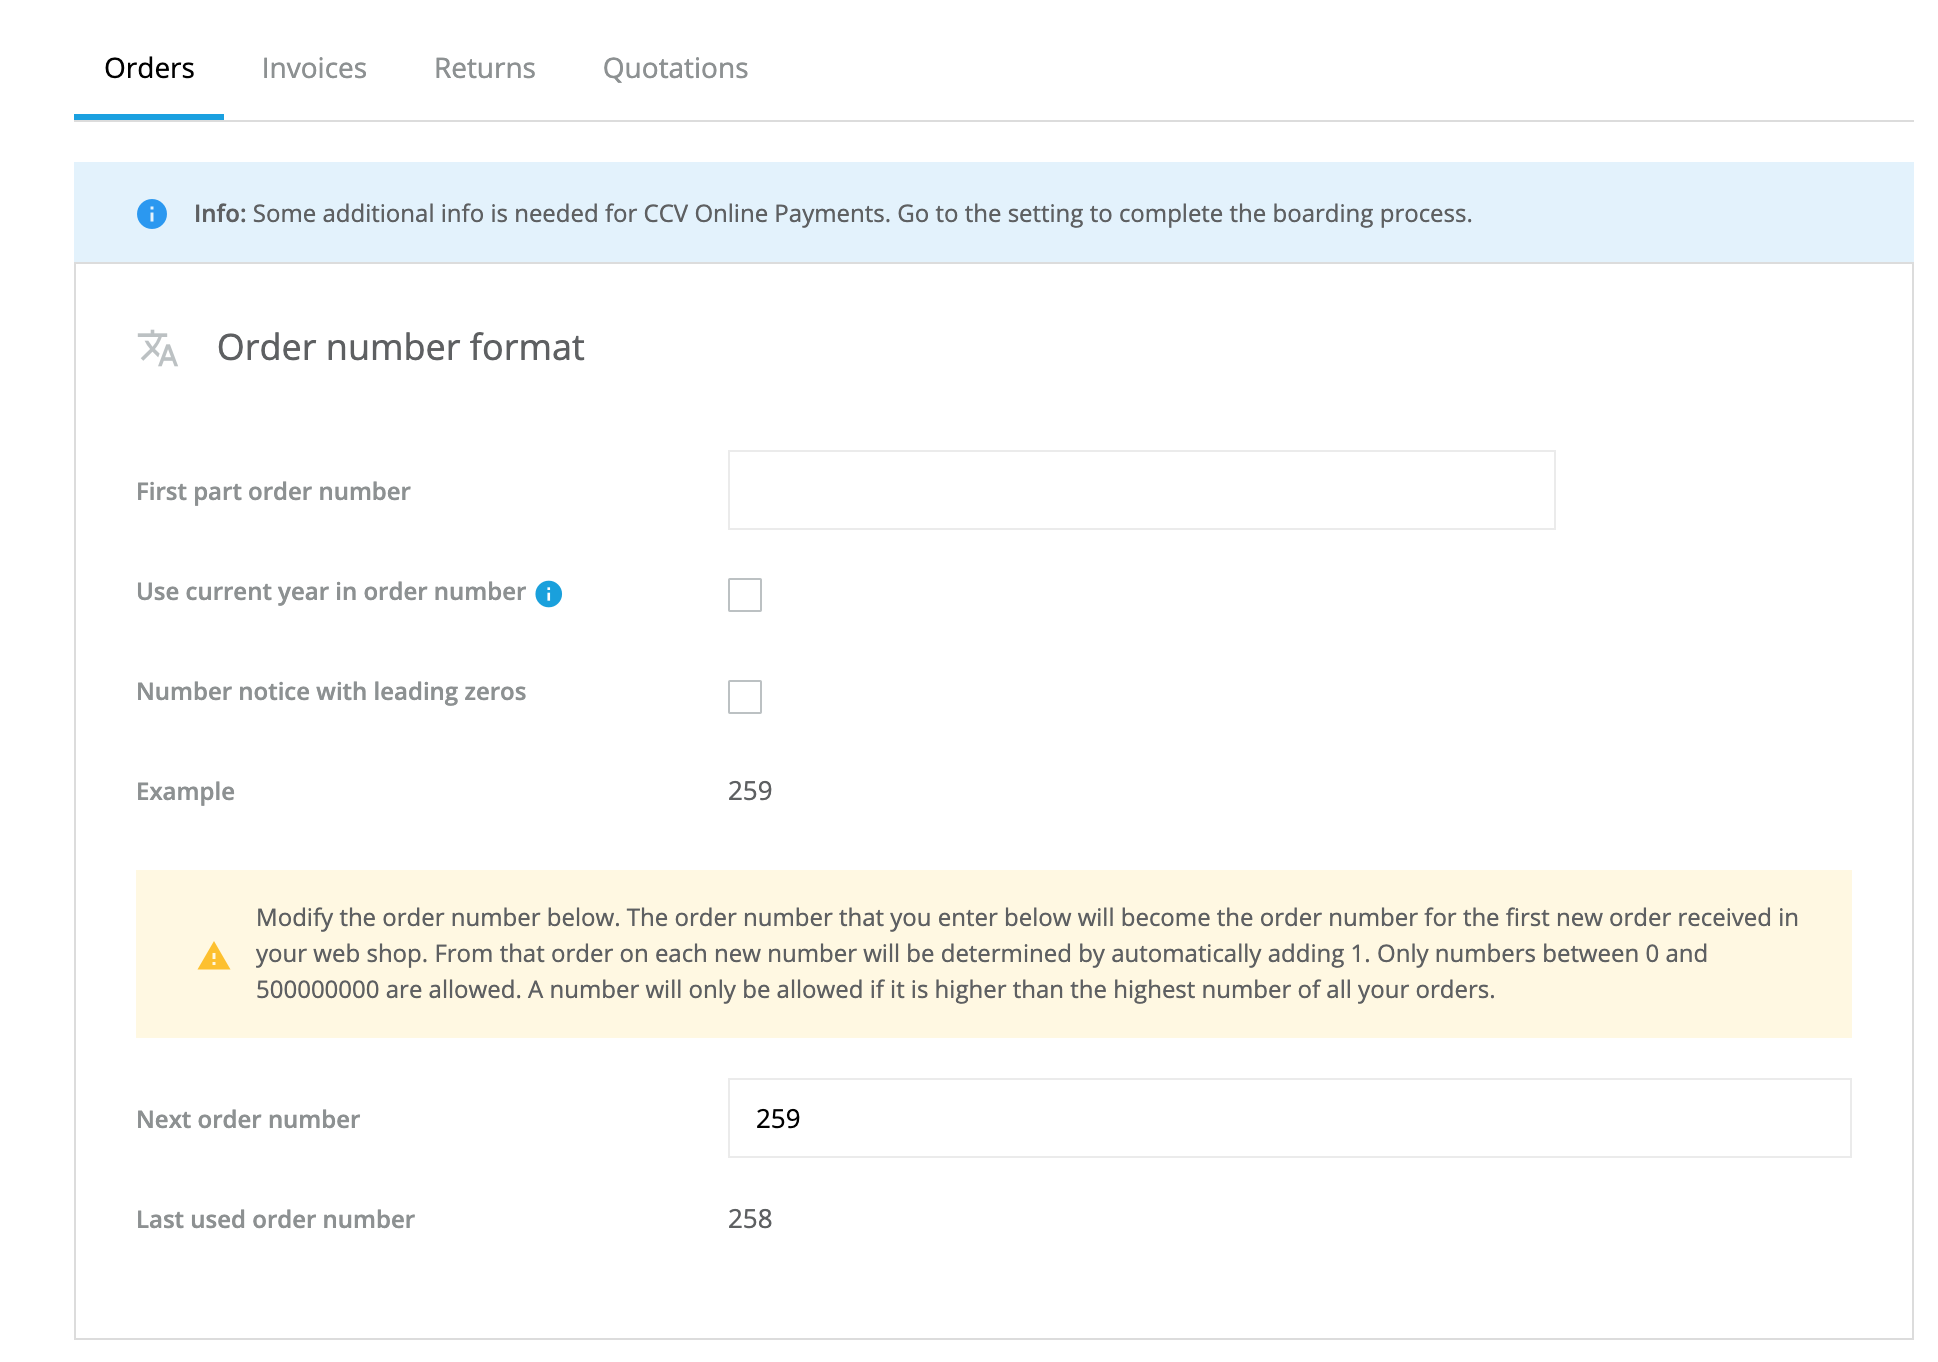
Formatting order number
As a web shop owner you have the choice to add initial letters (for example the letter 'ORD' for an order). In addition, you can use leading zeros (e.g. 00001) and as a web shop owner you can include the year in the number that will increase by one year each year and set the number behind it to zero. The changes are displayed directly in the example (e.g.: ORD2019-000001). Finally, you have the possibility to change the current order number at the next order number.
Reset order numbers
It is possible to reset the order, quotation, return and invoice numbers. This means that you can start counting per day, week, month, quarter or year from number 1 onwards. For example, would you like to start numbering your order numbers again every quarter by default? If you enable this setting, the order numbers are automatically reset per quarter. Please note that your order numbers will remain unique, but the leading number will adjust to this setting.
This setting applies to:
Order numbers
Invoice numbers
Return numbers
Offer numbers
Status settings
In addition to customizing the order number, you also have the option to rename and deactivate the different statuses with your own color. Statuses such as new, pending and shipped are represented in the design as disabled but active, which you cannot deactivate because those statuses are minimal needed for the order process within CCV Shop.

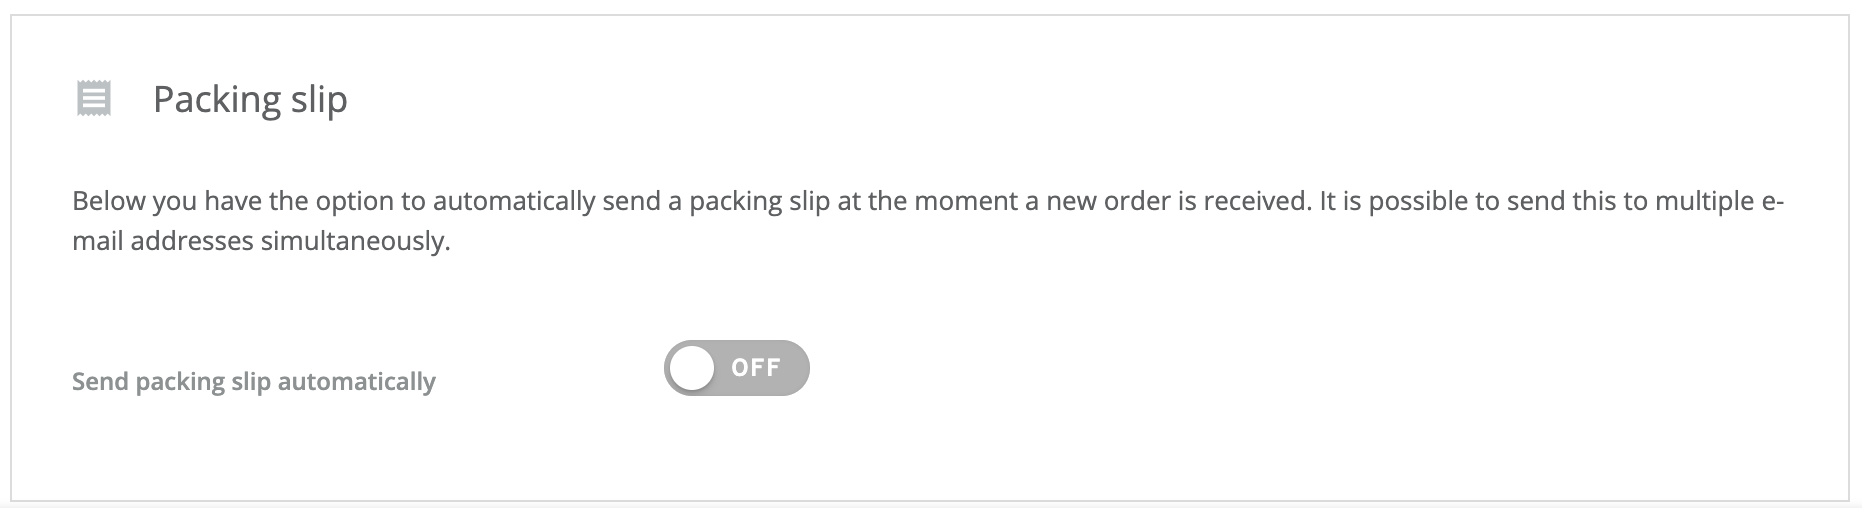
Packing slip
It is also possible to set the packing note to be sent automatically after an order has been placed. You can indicate here to which e-mail address the packing slip should be sent. Here you can add several email addresses separated by comma.
Invoices
Order number layout
We see under 'Invoice number format' that a distinction is made between debit and credit invoices. As a web shop owner you have the possibility to make a difference in the invoice number by separating the different (debit/credit) invoices by setting different leading letters. Finally, you have the option to change the current debit and/or credit number on the next debit and/or credit invoice.
Enabling/disabling the initial creation of an invoice
You can enable or disable the initial creation of an invoice. So you can edit an order yourself before you generate your first invoice.
Returns
Status settings
As with orders, you have the option to change the status title and color.
2. Returns
Formatting return number
Formatting the return number works the same as with the other tabs such as orders, invoices and quotations. In addition, you have the option to change the current return number with the next return number.
Status settings
In status settings you as a web shop owner have the possibility to change the statuses new, pending, cancelled and credited based on title and color. Also in this tab there is no status active/inactive included because the mentioned statuses are all mandatory within the system of CCV Shop.
Return form settings
In the settings of the return form you have the possibility to adjust three settings, namely: choosing a FAQ category, the right of return and adjusting the shipping information. We will briefly explain these below:
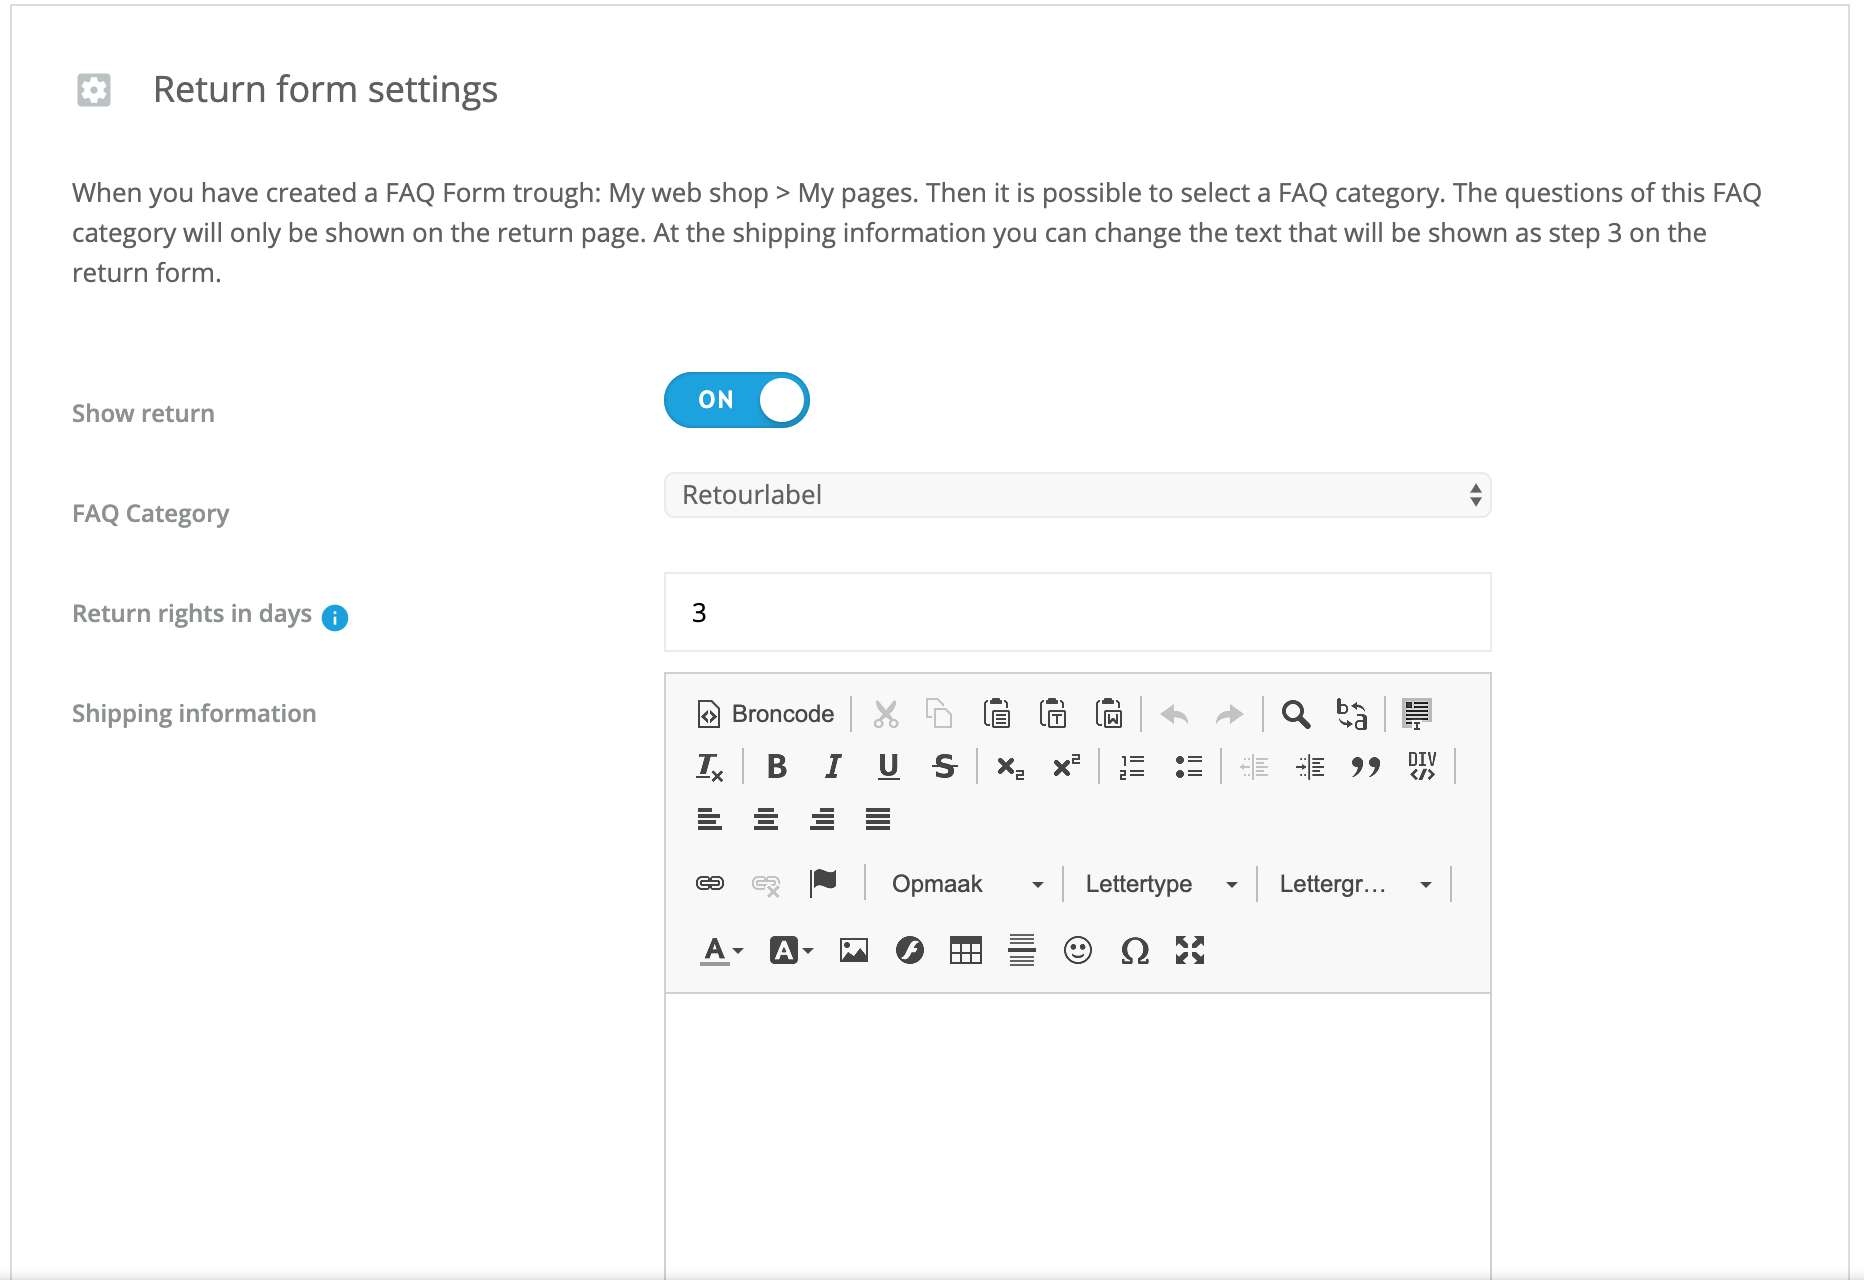
FAQ category
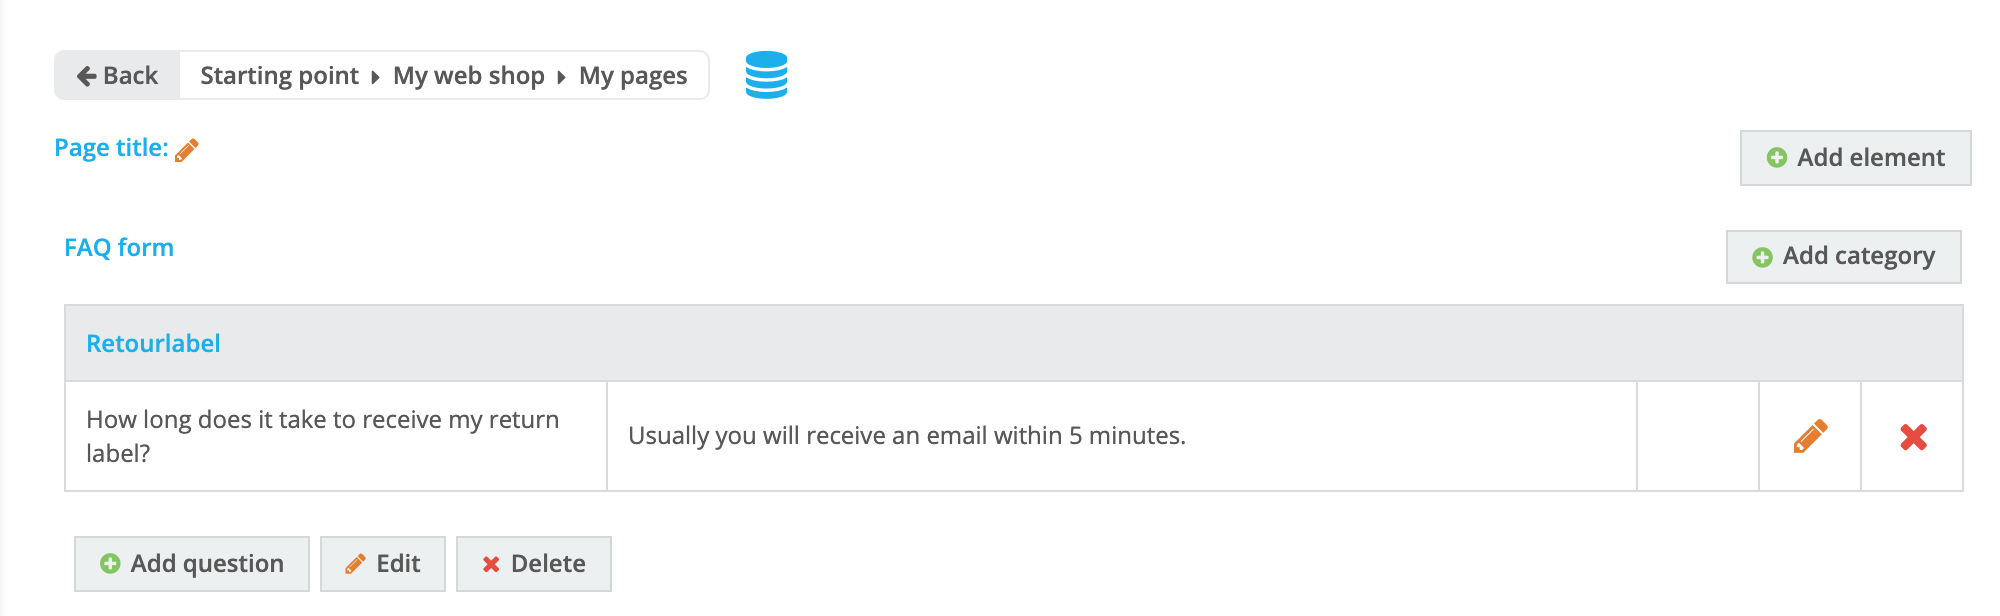
As a web shop owner it is possible to create different pages with elements, here you can also create a FAQ form. This can be done via Starting point > My Webshop > My Pages. Within the FAQ form element it is possible to select the correct return category in the dropdown. In the FAQ form you can create a category where you as a web shop owner can write both a question and an answer. Example:
Question:
How long does it take before I receive my return label?
Answer
As soon as you have created a return you will be able to download the return label.
After choosing the FAQ category, the FAQ block will be displayed on the return form and on the thank-you page if you have set this up specifically. You can set this specifically via Starting point > My Webshop > Settings > General > Texts.
Right of return
In addition to choosing a FAQ category, it is also possible to adjust the right of return. By default the right of return will be 14 days. The return button and function will expire after 14 days (purchase date).
Shipping information
With the shipping information (step 3 of the return form) you have the possibility to provide information based on the shipment of the products to be returned. There will be a standard text that you can adjust to your wishes. If you leave this text blank, this shipping information will not be displayed on the return form.
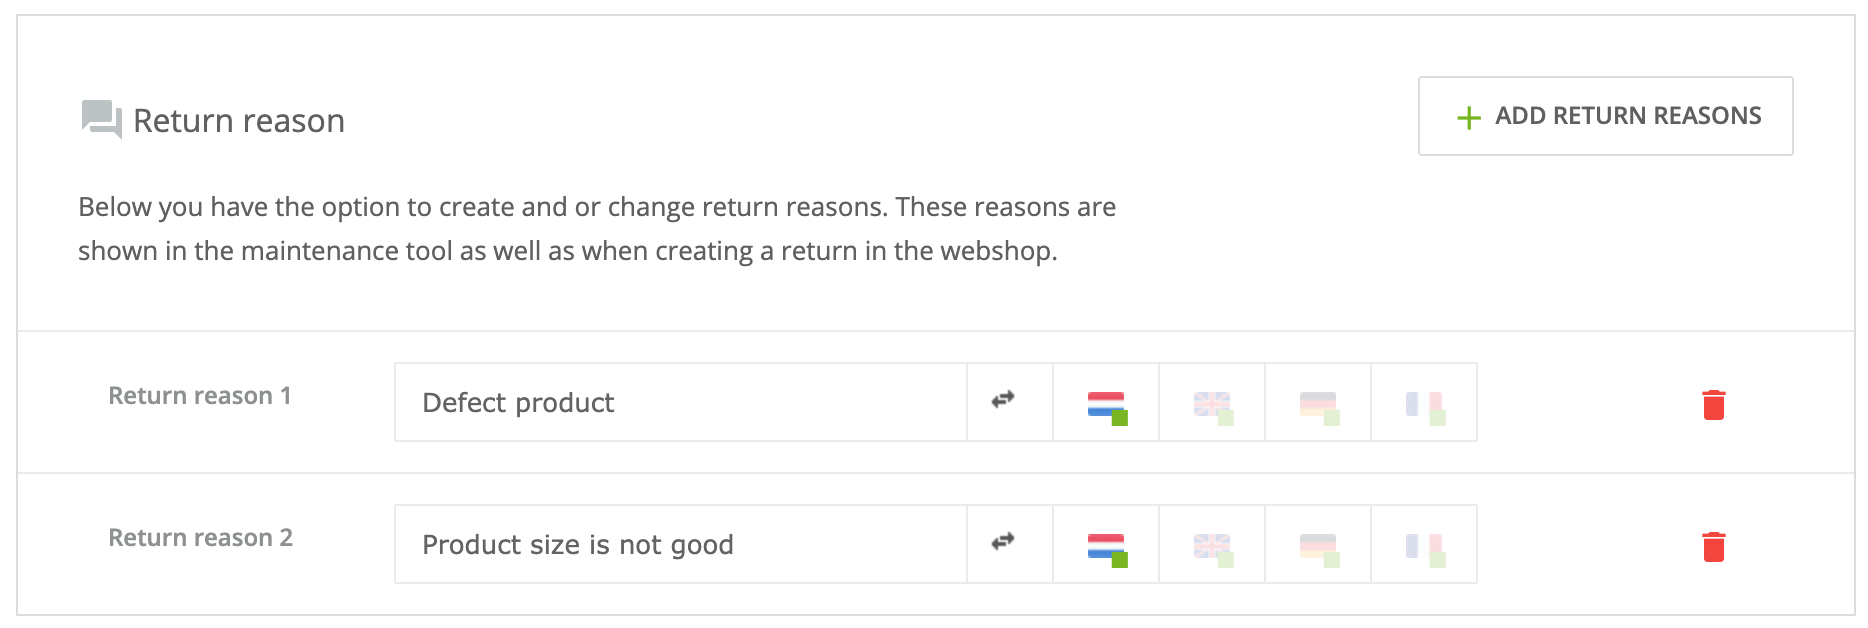
Return reason
As a web shop owner, it is of course important to be able to modify, delete and add returns. By default there will be 3 reasons that you can edit, you can also add reasons. If there are no reasons (all reasons removed) the dropdown will disappear in the return form. With the return reason your customer can give a reason why the product is being returned. Your customer also has the option to further explain the reason in the text section.
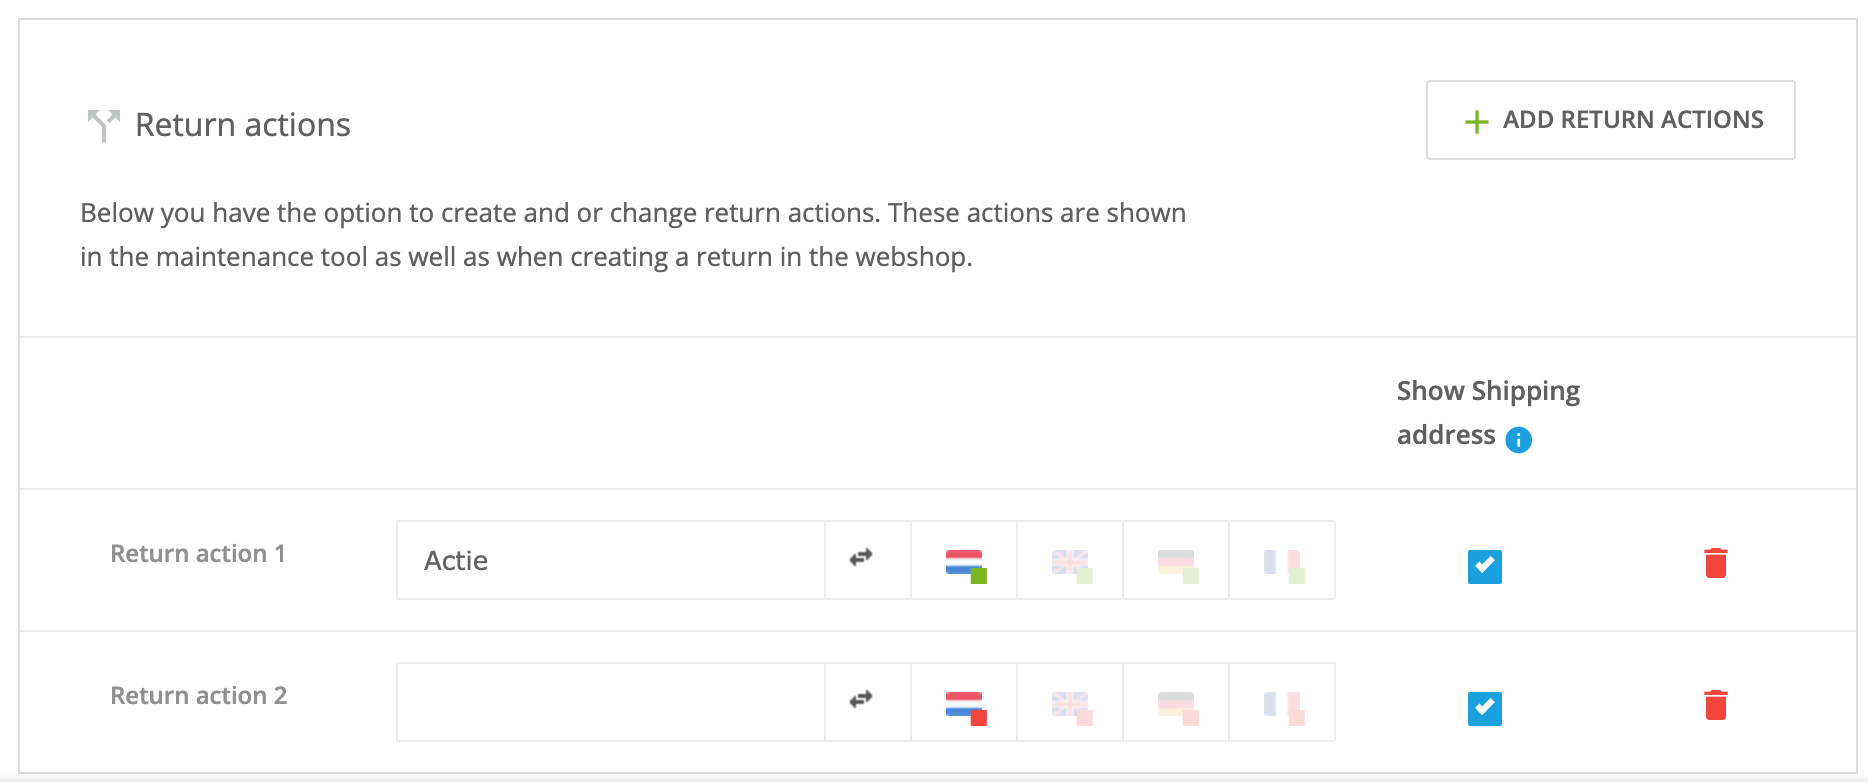
Returns
Finally, as a web shop owner you have the possibility to create returns. With the returns, the customer or web shop owner can indicate which action follows a certain return. Both the return reason and the return can be viewed and adjusted in the returns tab of an order. With each return you can indicate whether step 2 may be displayed on the return form. (Step 2 is to check the address details for sending a replacement product, for example).
Different Return Address
Would you like to choose a return address that is different from the address of your webshop? This can also be set in the return settings. You can enter a different return address here. The address will then be shown on the return labels sent to your customers.
Quotes
In the workflow settings there is also a separate tab for quotations. Here you can add your own color to different statuses and rename them. You can also format quotation numbers.
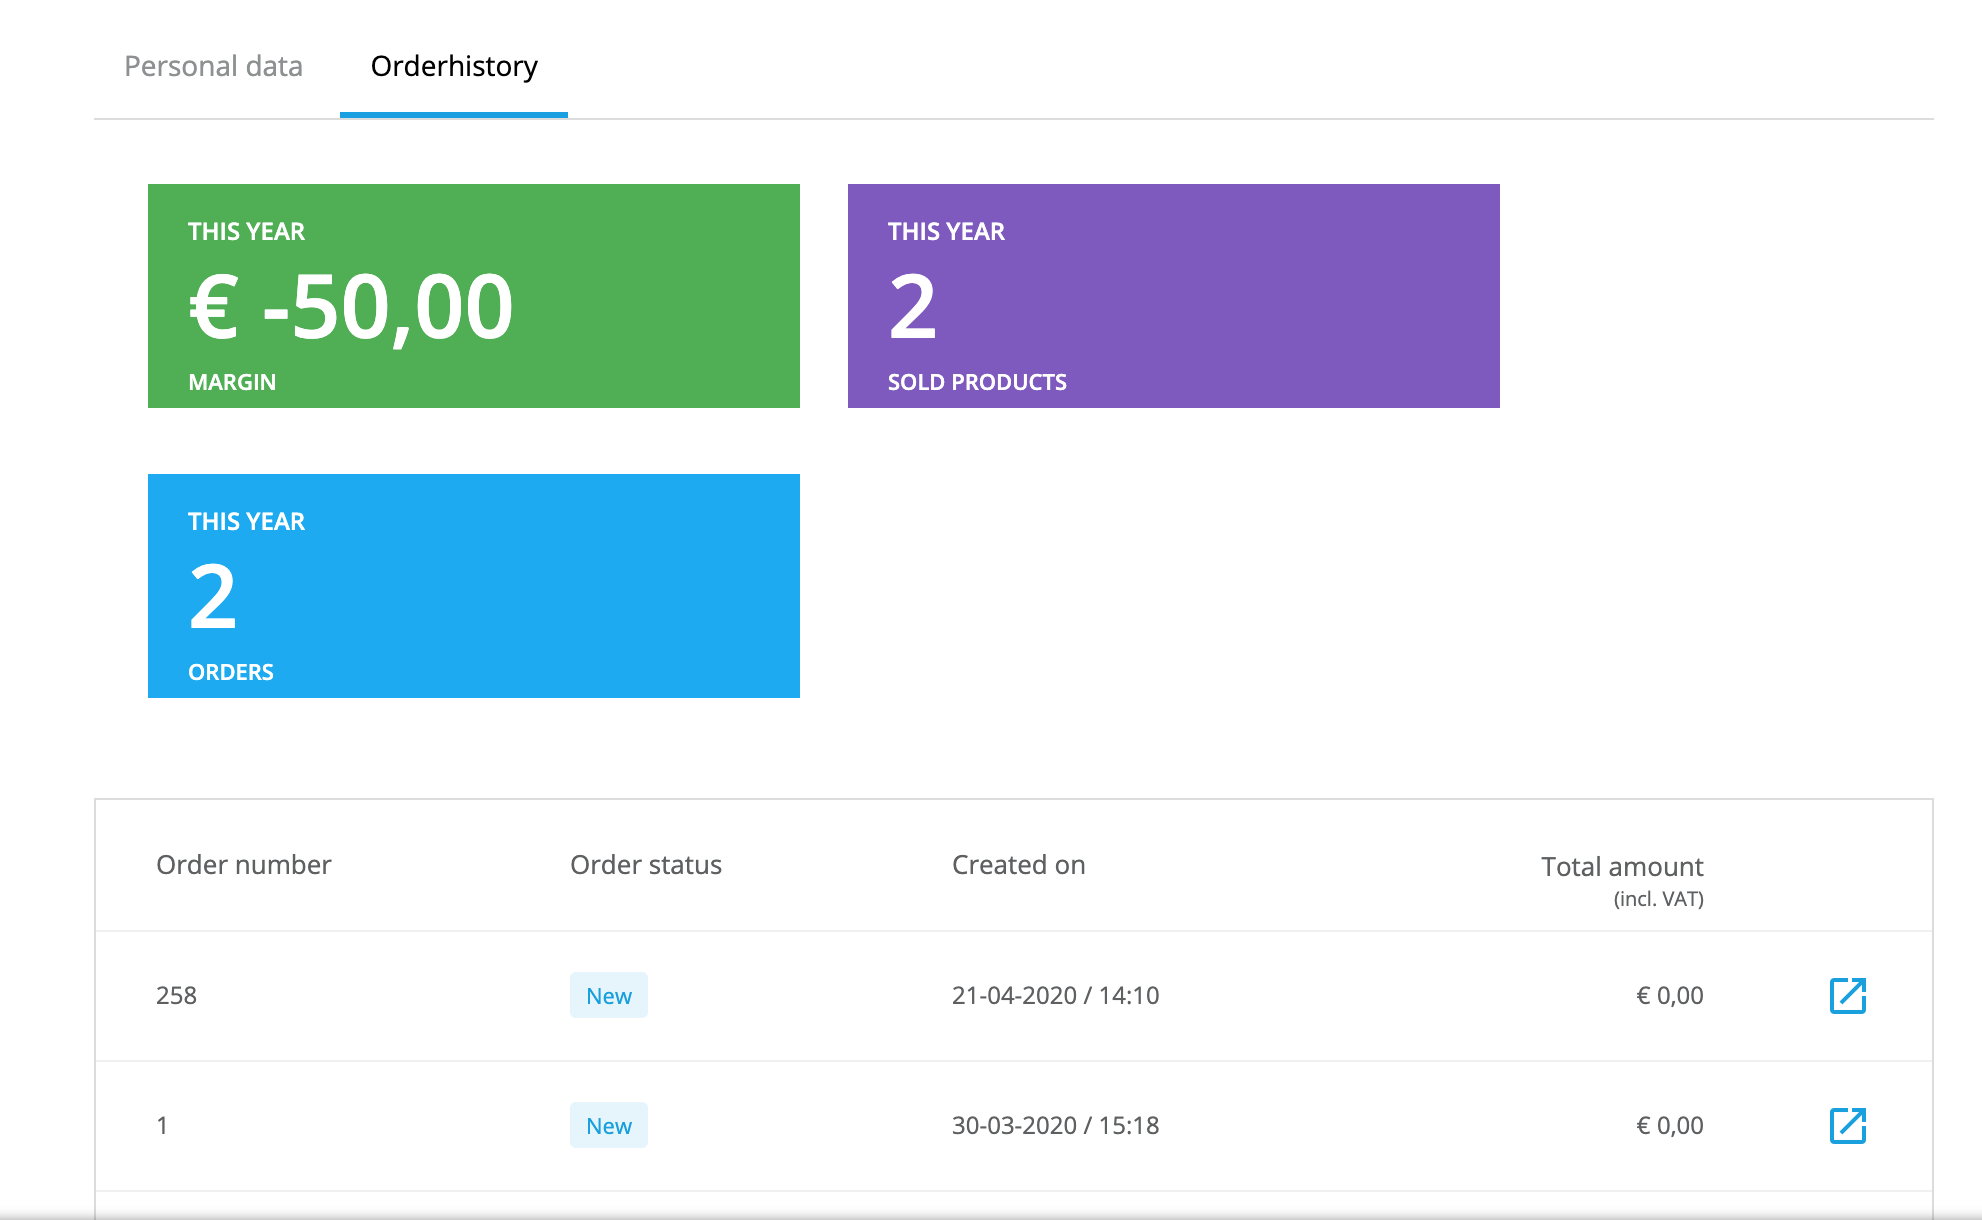
3. User order history
As a web shop owner you get more and more control to make settings specifically for that user, therefore it is now also possible to view specific information per customer / user. For example, do you want to see the number of orders, the number of visits or the total amount that the customer has spent in your webshop? This is possible via Starting point > My Customers > Users.
You will see two tabs on the detail page of the user, namely 'Personal data' and 'Order history'.
4. My Orders
Via Starting point > My Orders you can access order management, quote management, invoice management and returns management. You can also find order statistics, export orders and the CCV Pay Dashboard here.
You can view all orders via Start > My Orders > Order management. You can quickly search here by entering the order or article number in the search bar. If you want to filter or advanced search, the filter fields will open when you press the filter button on the right side of the screen. You can also search more specifically on for example: track & trace. Just like with the quotation management there is also a button with default values where you can set default values for filtering and sorting. Think about showing the number of orders, the payment methods, or whether the order has been paid.
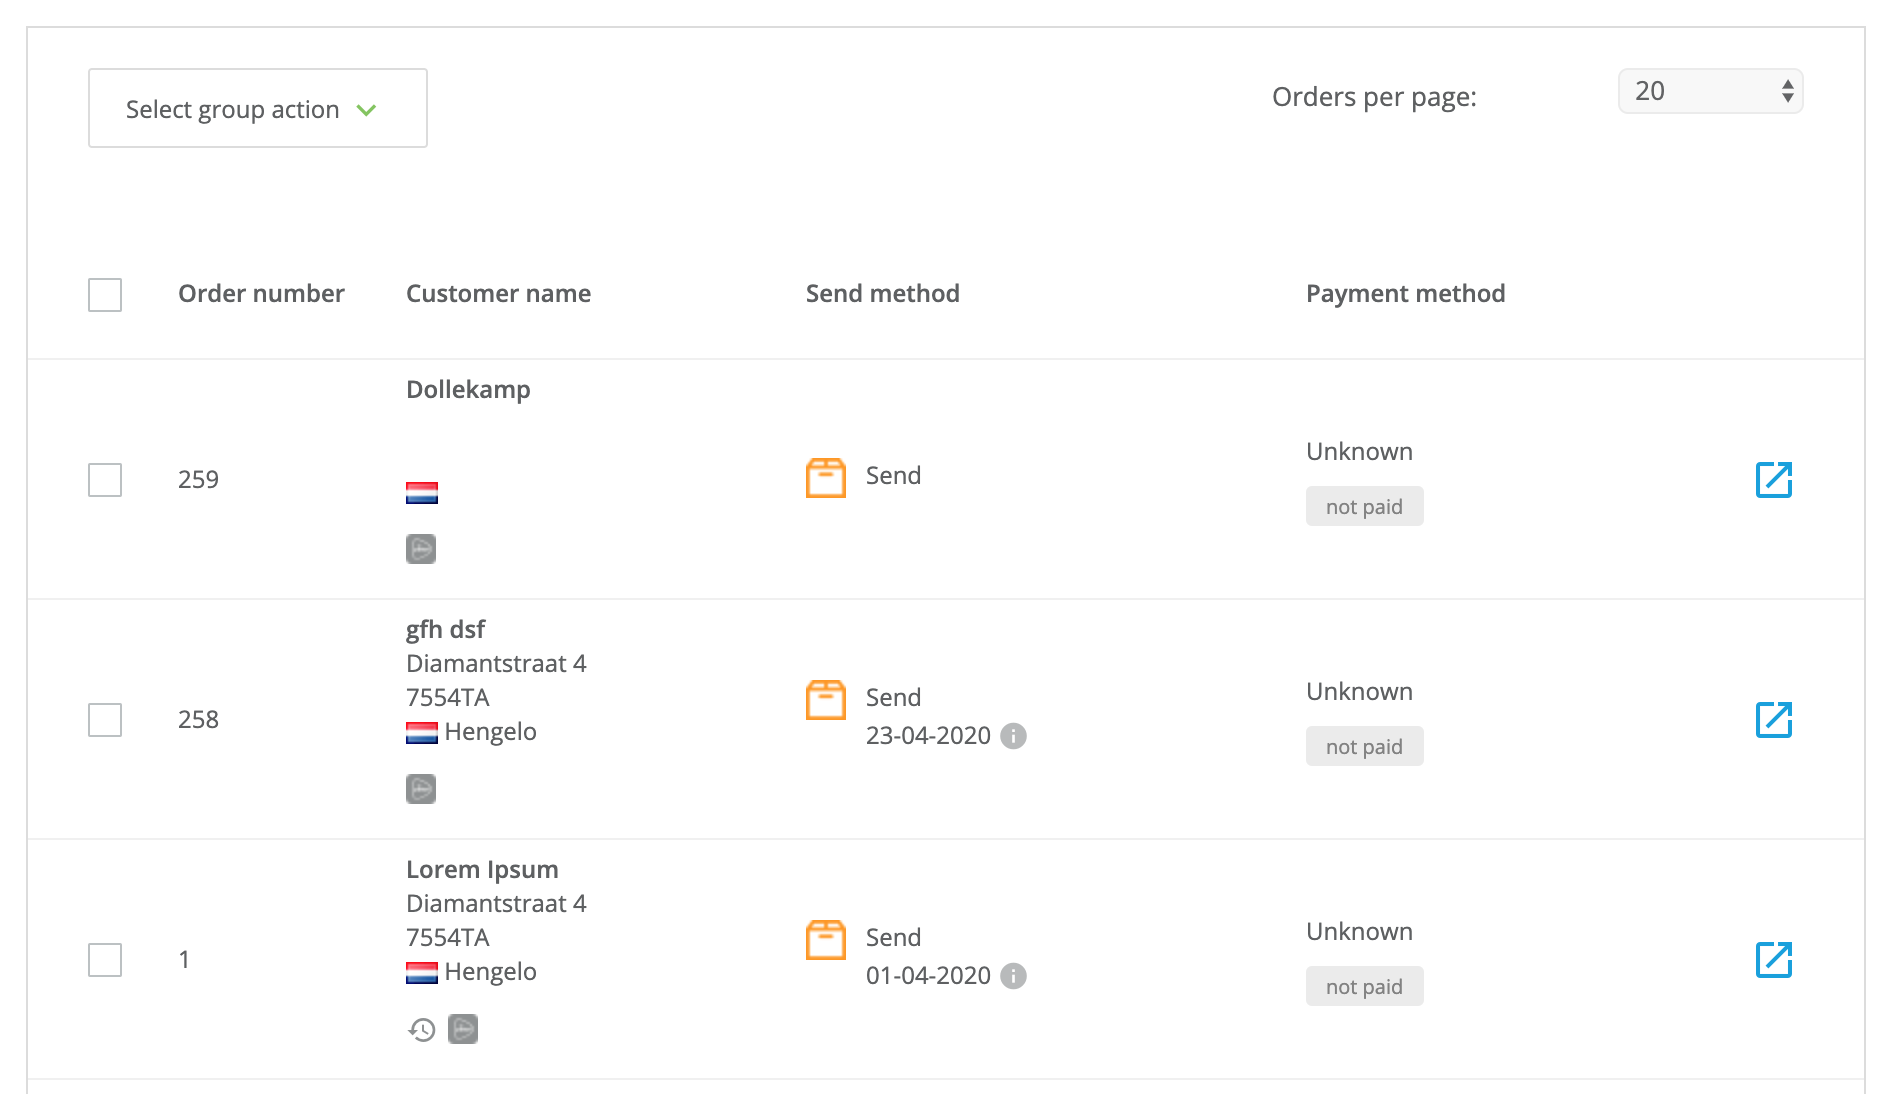
Under searching and filtering, the orders are displayed in a table. In the table you can read the following values of an order: order number, customer name, shipping method, payment method, order status, created on and total amount. Do you use Multishop and shared order management? Then the name of the webshop where the order is placed will also be shown. There is also an option (dropdown) to filter based on shop name, so you can quickly and easily see in which shop the orders are placed.
When you click on an order in the order manager, you will automatically be taken to the order detail page of that specific order. Here you can see different tabs which we will explain step by step below.
Order detail page
Order list
The first tab gives an overall view of the order. From the order overview you can perform quick actions or navigate to one of the other tabs where you can perform different actions. You can also use the arrow to collapse the menu on the left, so that you can view the entire order.
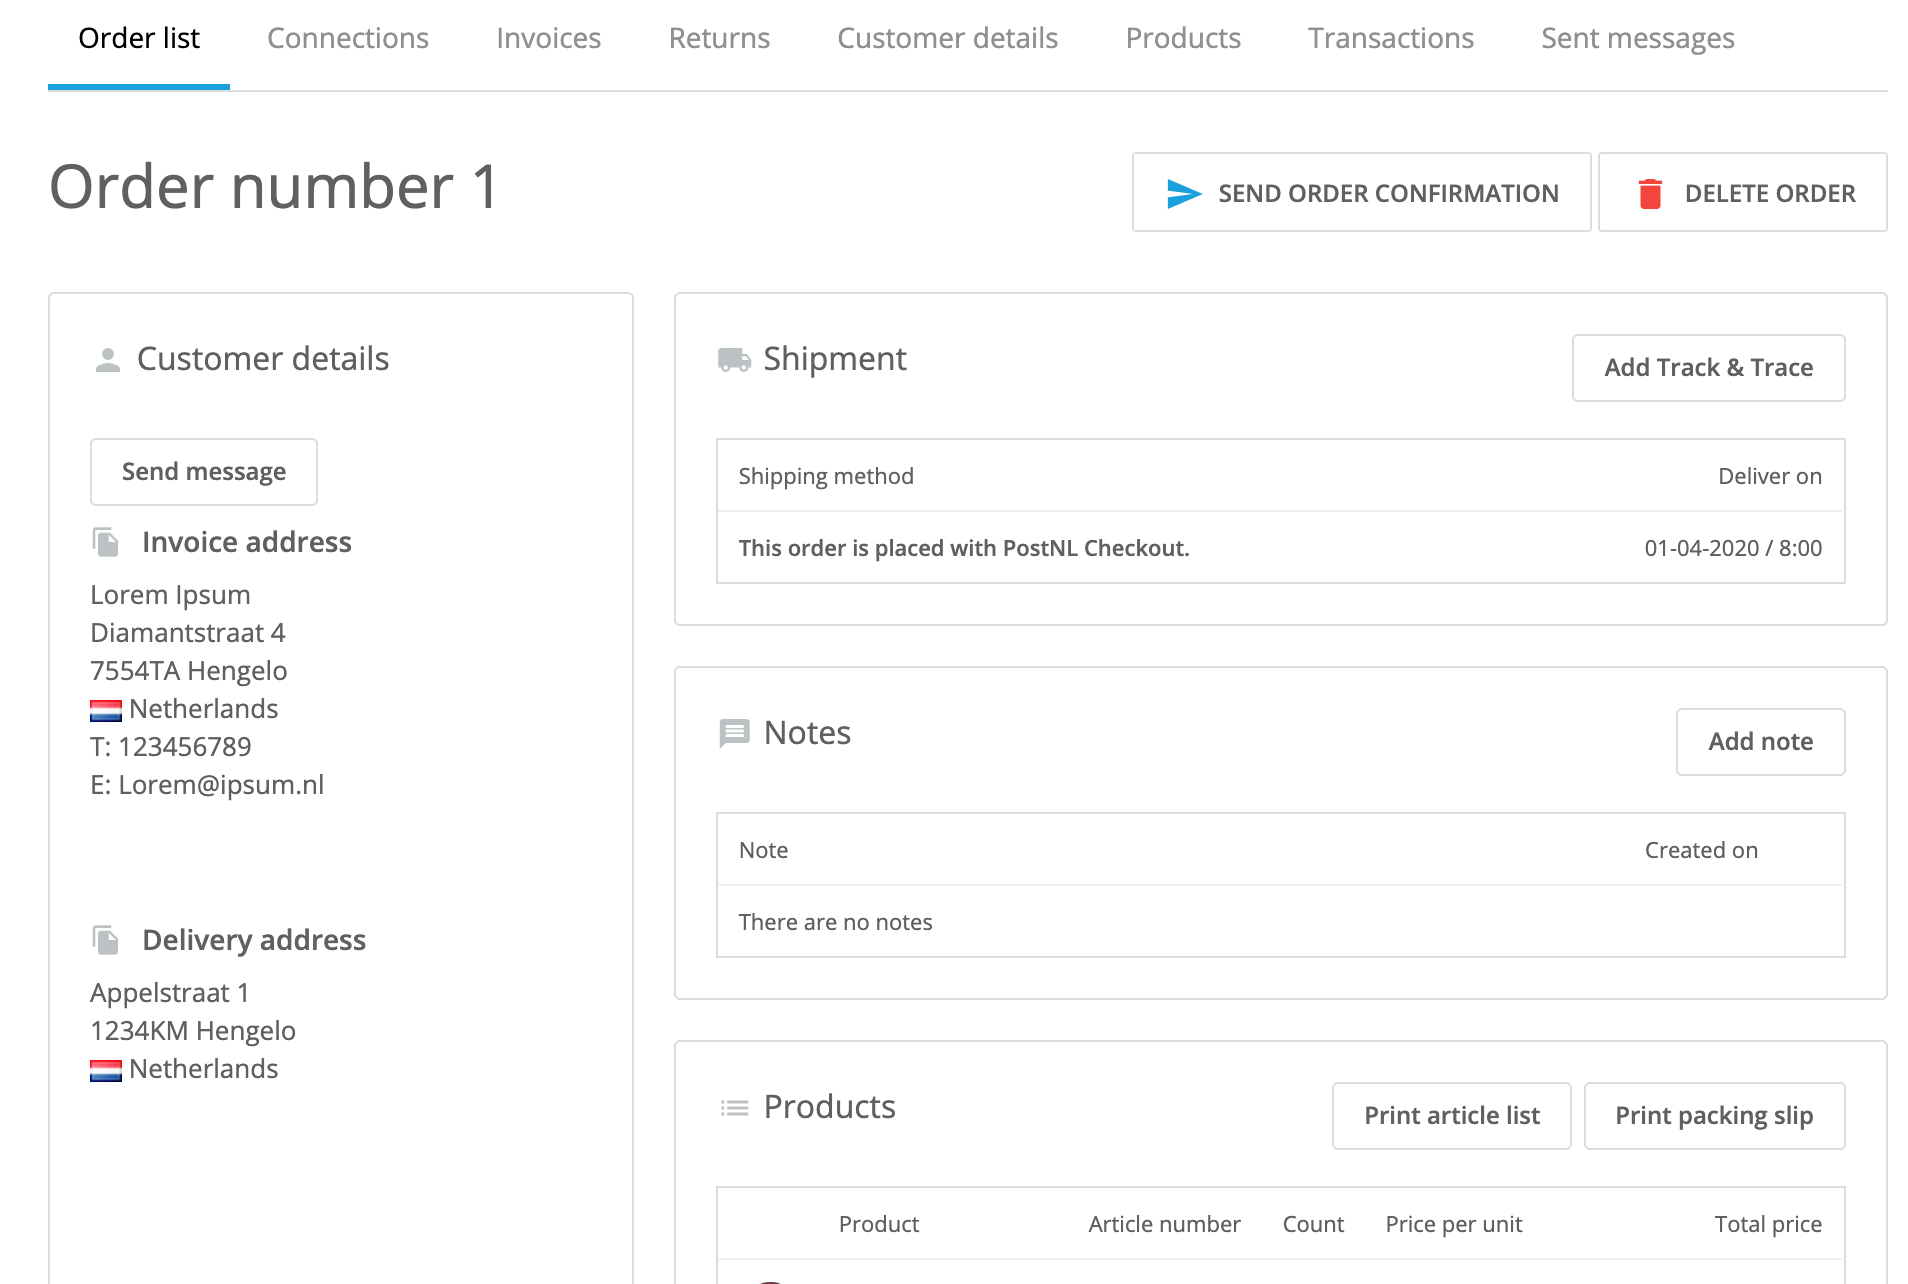
In the first block (left) the customer data is displayed. You will see the billing address, the delivery address, any customer comments and a map of the customer's location. In addition, you have the option to send a message using the 'Send message' button.
The second block indicates the shipping method. This can also be used for delivery or pickup. As a web shop owner, you can enter a track & trace code that the customer receives. When you choose this, a pop-up will appear where you can fill in the track & trace. Here you can also set the order status to sent and inform the customer.
The third block is a display of the order notes. These are (internal) notes that you have noted in this order. For this view applies: the first item is the most recent item.
The fourth block, under shipping and notes, displays the products included in the order. Here you also have the possibility to print out a list of items and a packing note.
The fifth block indicates the Status History. Here you can quickly see the status of an order. The most recent status is at the top. The button 'Change status' opens a pop-up in which you can change the status and also send a message to the customer about changing the status.
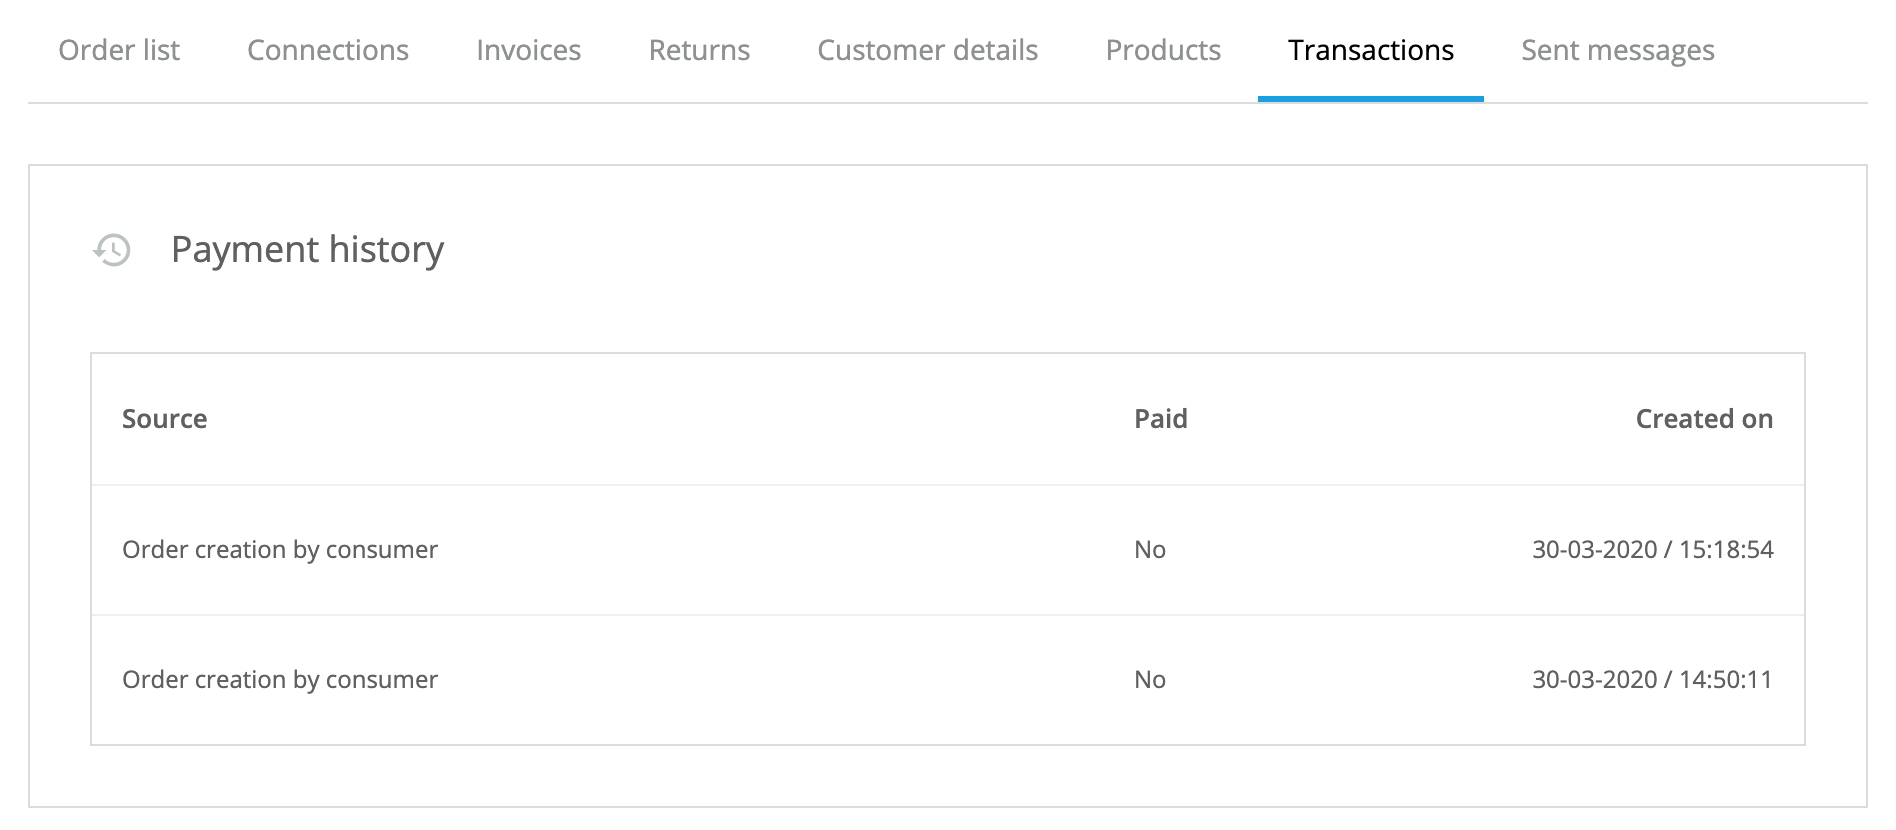
The sixth block (below the products block) displays the Payment History. The payment history indicates whether the order has been paid or not. In addition, a record is also kept of how and by whom an action concerning a payment was made and on what date and time.
The seventh block in the order overview shows the invoices. Each order may contain several (debit/credit) invoices. In the block, a table of invoices is displayed with the invoice number, status, date and total amount. It is also shown whether an outstanding amount or an amount to be refunded applies. When there is an outstanding amount and a debit invoice has not yet been paid the button 'Send payment link' will appear in this block (When the payment link app is activated). You can use an action to send a payment link so that the customer can (still) pay the outstanding amount.
In addition, it is possible to display an overview of the products ordered per category in the order overview. You must first enable the setting for this yourself. This can be found under: Starting point > My Webshop > Settings > Layout > Invoice and packing slip layout.
Next, you can check the option "Show products per category on order overview".
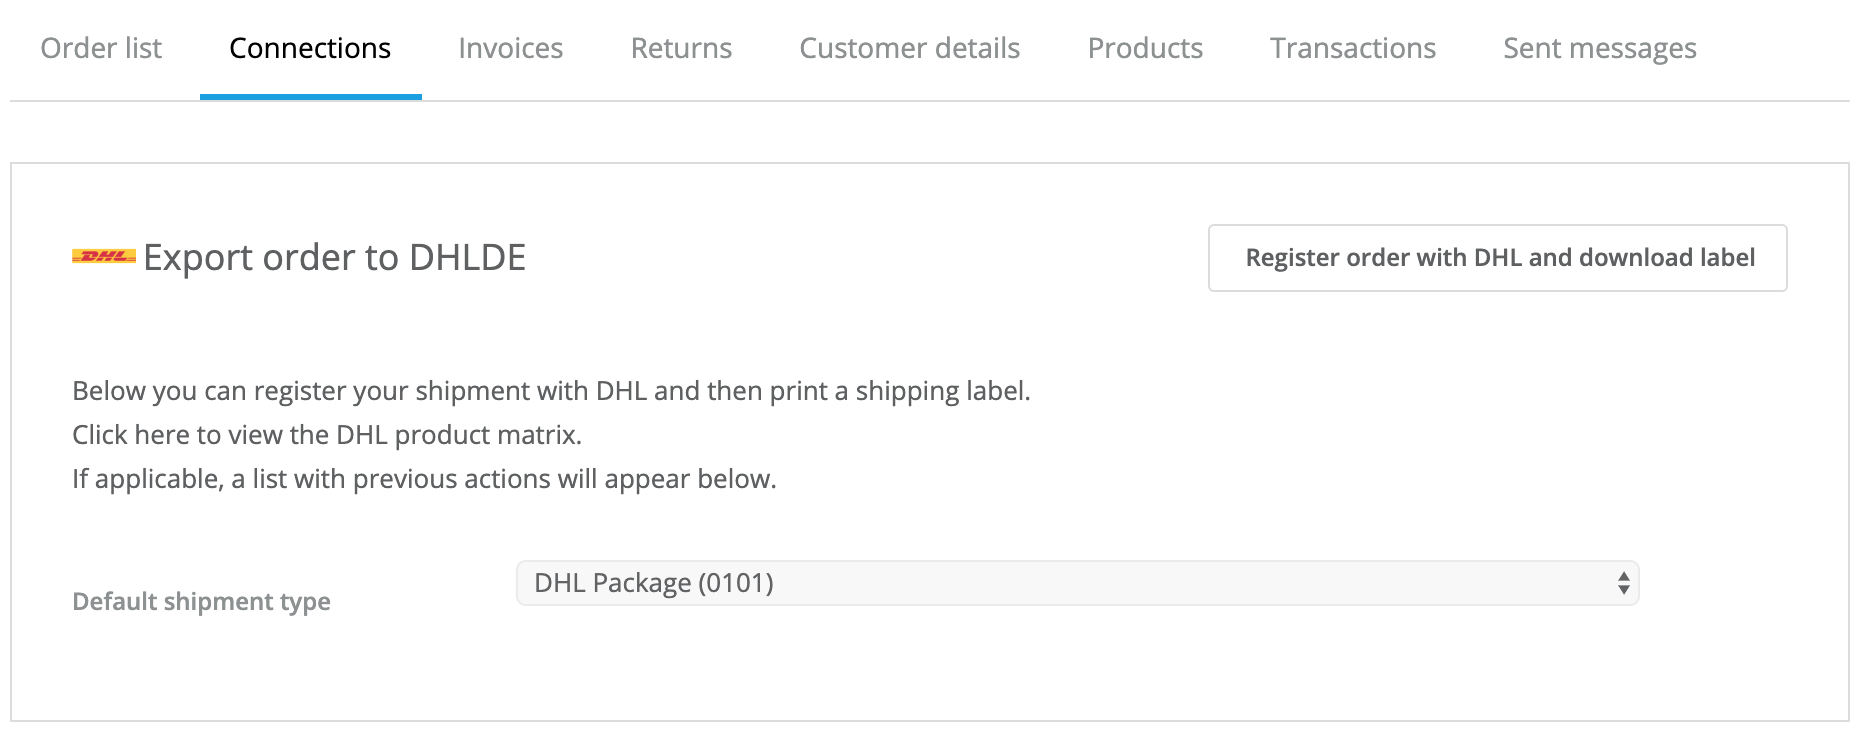
Connections tab:
In the links tab you can see links that you have created with external parties. Think for example of MyParcel. In this tab you can easily register an order and download the shipping label.
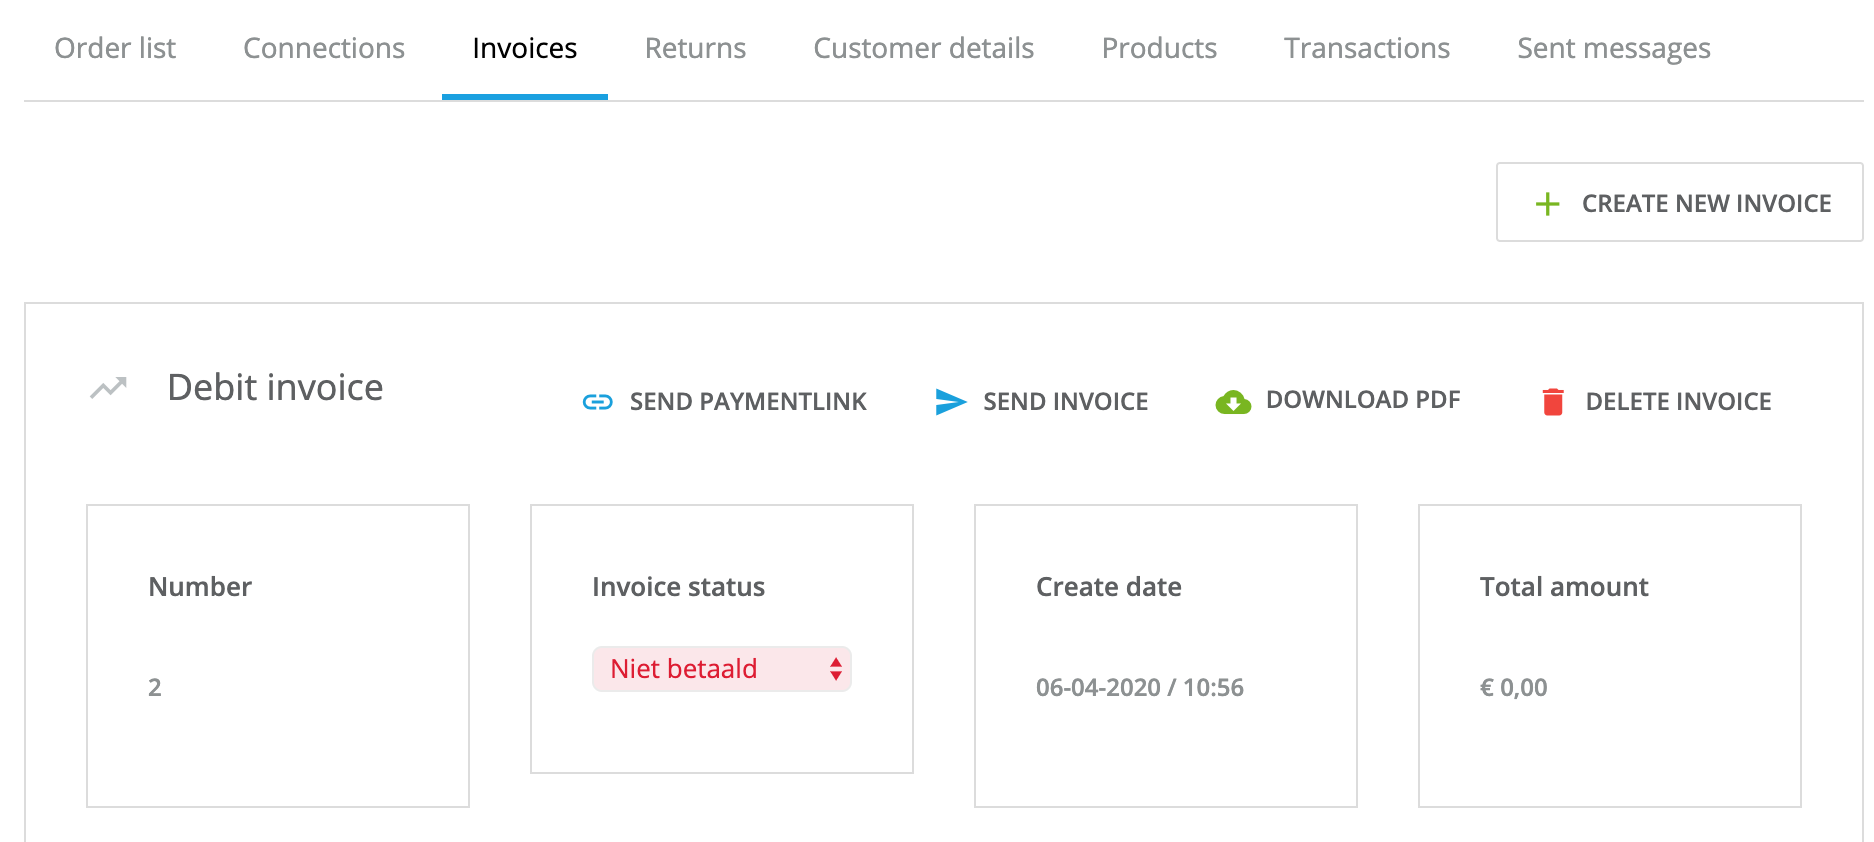
Invoices tab:
This tab displays the invoices. You can view the invoices of that order, send them by email, send a payment link when there is still an amount outstanding and the invoice has not yet paid the status, change the status and download a pdf of that invoice. The most recent invoice is also at the top of this overview. In addition, you can also manually create an invoice here after the order has been adjusted.
Returns tab:
In the 'Returns' tab you have the possibility to view returns of that order and it is possible to manually create a new return when there are still products that have not been returned. When this is the case, you only have the possibility to view returns, and to change the status, return reason and return.
When creating a return manually, a pop-up will appear in which the products that have not yet been returned are displayed. By entering the number per product you indicate which products and how many you want to return. When you click on apply, the products will be added to the return. The return will be final at the moment you click on save or apply. Again, the system takes into account changes in the order and creates a credit invoice where necessary at the time a return is created.

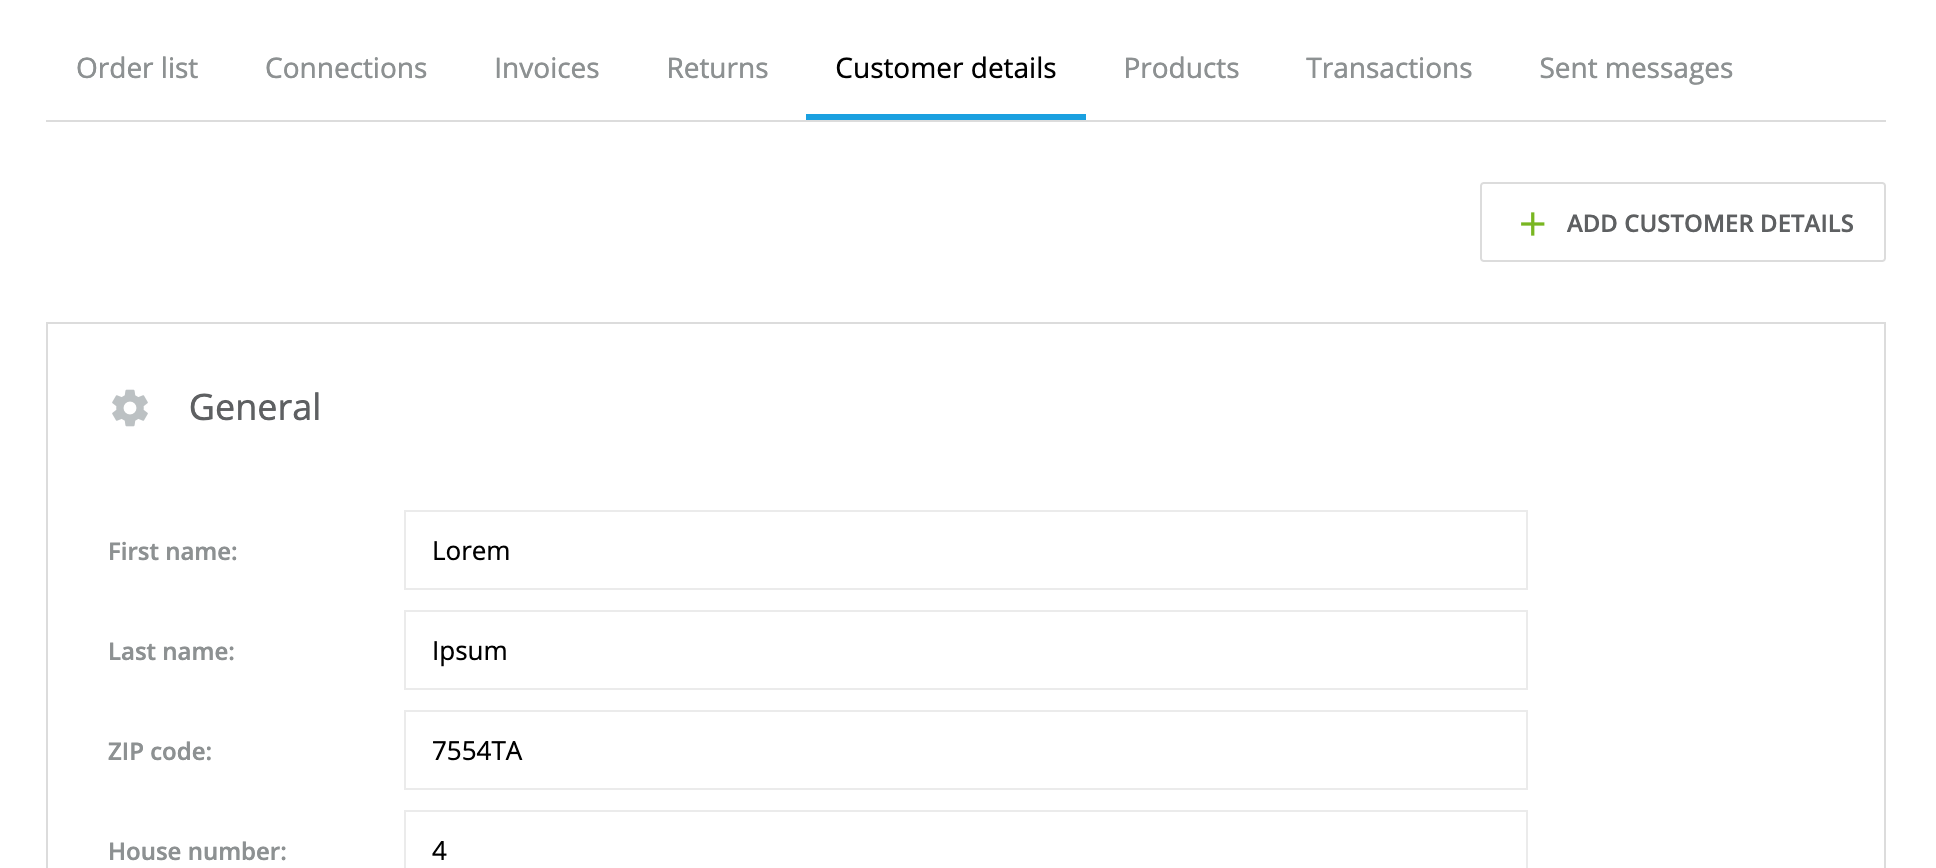
Customer details tab:
In this tab you can easily view the customer details and comments of the customer or user. You can also edit or look up the data here and add them to the order. At the top you will find a button called 'Add customer details'. In the pop-up you can search for a name of a customer or user, choose the correct data and the data will be filled out in the form. After saving, the data is saved/modified.
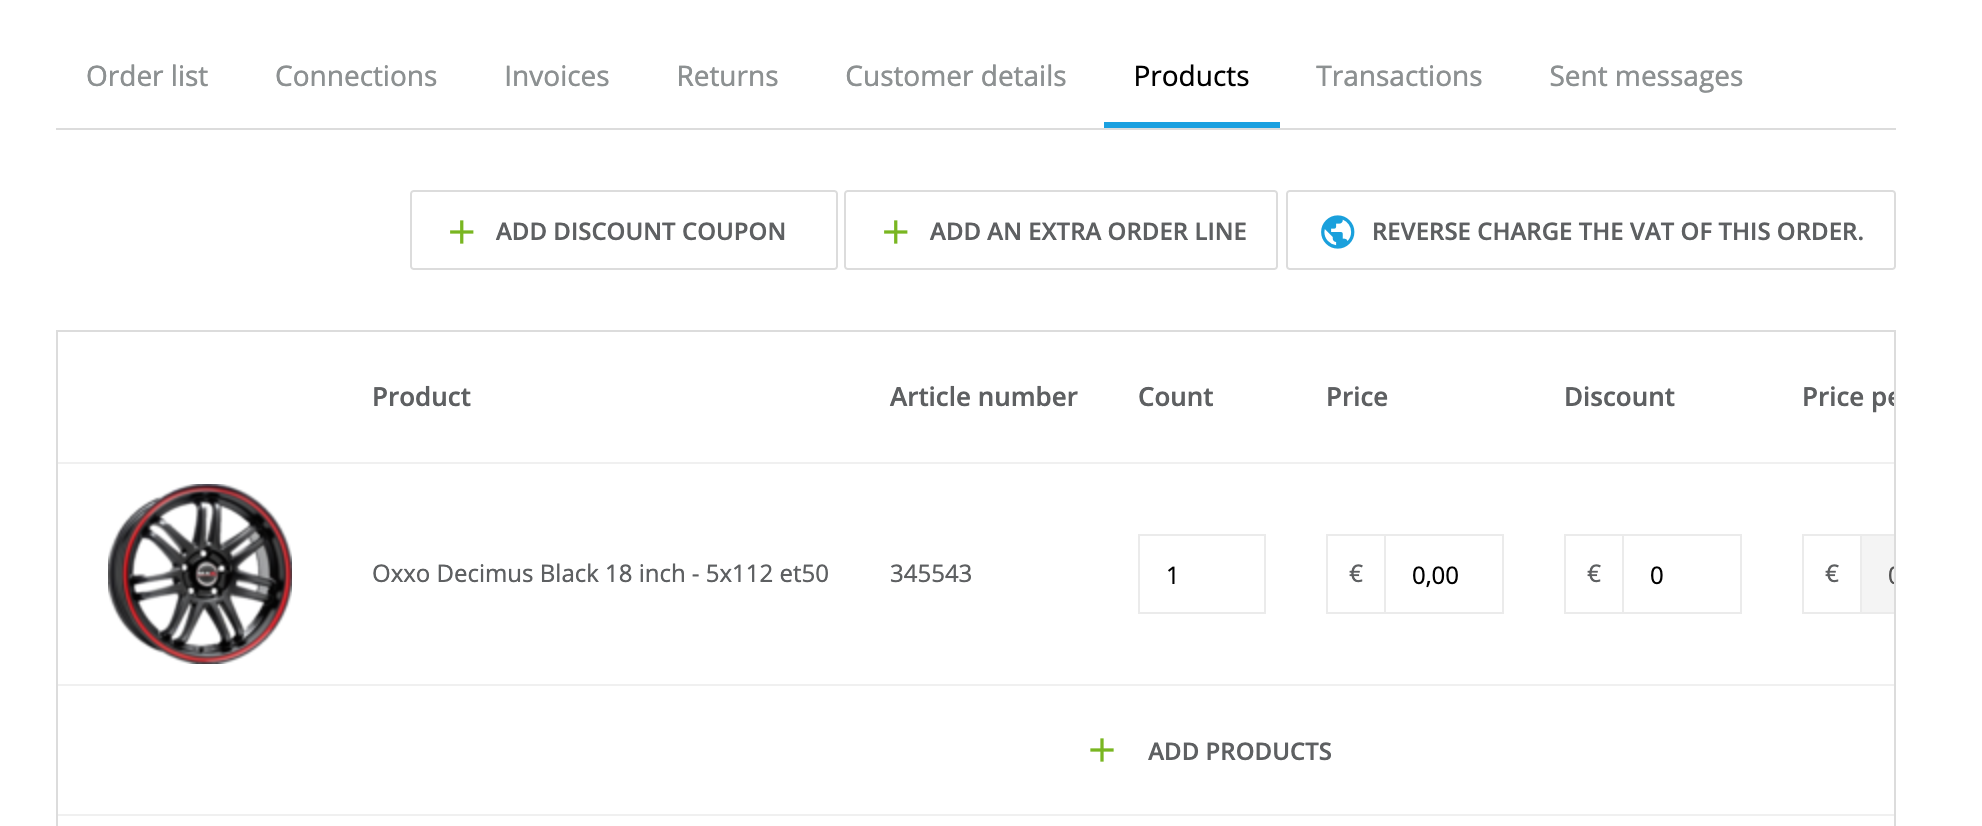
Products tab:
In this tab you can view the products that are included in the order. In this tab you also have the possibility to change the products, add new products, add one or more order lines, give discount or costs and remove products. Once an order has been sent, it is still possible to modify the order. The system takes differences into account and, based on the changes, creates a credit or new debit invoice on which all changes can be seen with the outstanding or refundable amount.
When the VAT is shifted (reverse charge the VAT of this order) two invoices are now generated: the current order is credited after which a debit invoice is created for the amount without VAT.
Transactions tab:
This tab displays various things related to the transactions such as postpayment (for example, sending invoices to Klarna), CCV Online Payments transactions (for chargeback and viewing transactions via CCV Online Payments) and the payment history.
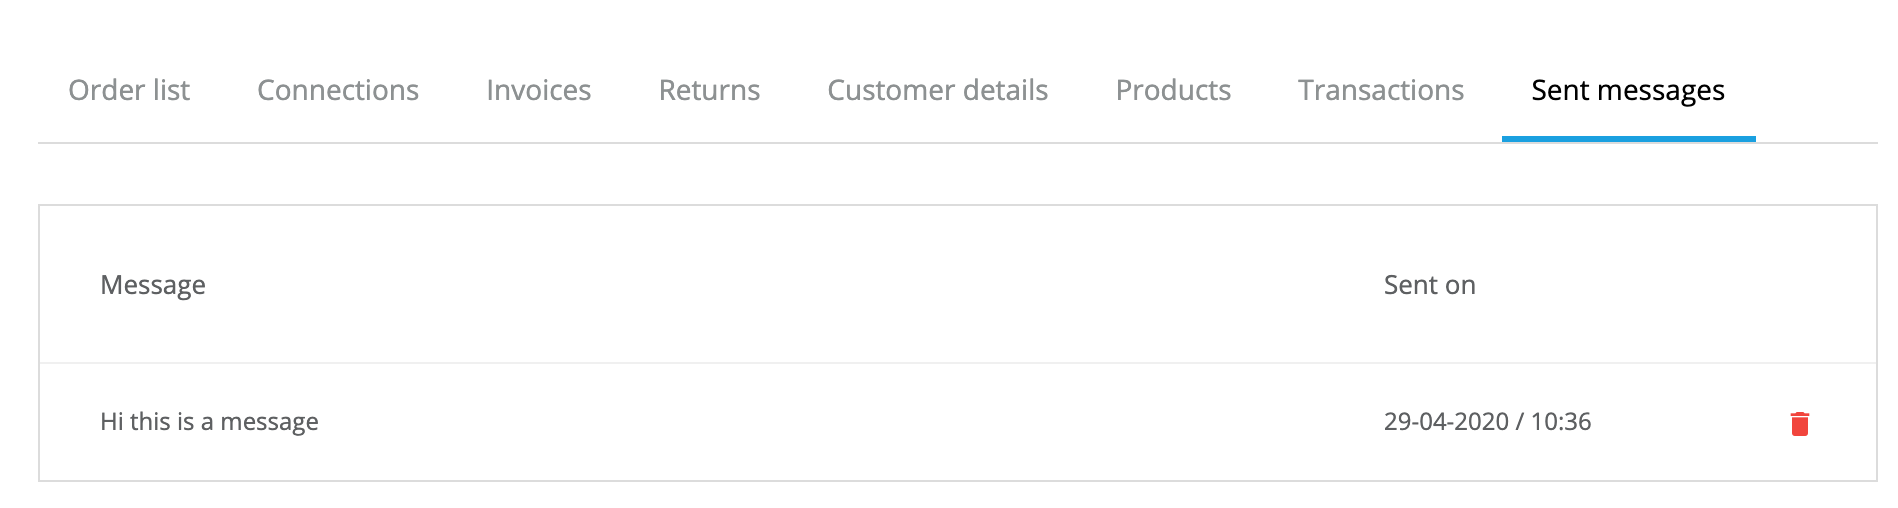
Sent messages Tab:
The last tab contains messages that are either created automatically during changes to the order or sent manually to the customer. When the status of an order changes, for example, you also have the option to inform the customer. The message that is sent will be saved under this tab. You can also send a message by clicking on the button 'Send message' in the first block of the order overview tab. This message will also be saved in the 'Sent messages' tab.
Logbook tab:
In the logbook all events related to this specific order are recorded. Here are a few examples:
- Order created
- Status changed to new
- Invoice created
Group actions:
In the agenda in the order management it is possible to select orders and print the invoices and packing slips via a group action. You can find the agenda in the order management via: Starting point > My Orders > Calendar.
Invoice management
Via Starting point > My Orders > Invoice management you can easily view an overview of all debit and credit invoices. In this overview you see invoice lines with the corresponding invoice number, order number, customer name, invoice status, debit or credit invoice, created on and total amount. The overview is purely intended to quickly find an invoice or to bundle multiple invoices with an order. In addition to group actions that you can perform for multiple invoices, you can also change something per invoice line or view the invoice. When you choose to view the invoice you go to the tab 'Invoices' in the order detail page. Here you will see all the invoices that apply to that order.
Returns Management
You can view your returns via Starting Point > My Orders > Returns Management. The information in this overview is the return number, order number, customer name, return status, created on and total amount (incl./excl. VAT). Also in this overview it is possible to perform group actions and view or change a return by clicking on the return line. When you click on the return line, you will see the returns tab on the order detail page.

5. Quotations
Do you provide services or exclusive products? Don't want or can't you mention prices or rates for whatever reason? Your visitors can easily request a quote for one or more items using the free "Quotes" app. This gives you the opportunity to make a suitable offer for each customer.
After activating the 'Quotes' app in the app store, a number of settings are available in your maintenance tool. Via Starting point > My Webshop > Settings > Order process & stock > Quotation settings you will find the following settings:
Quote title: change the text on the quote button here.
Text in category views: determine here which text you want to show in the category view with the quotation products.
Accompanying text: set the text shown on the quote page here.
Quotation texts: you can set here which texts should be shown in the emails. This consists of a header and a footer. These are also shown on the page that the customer will see when the quote is accepted.
How the offer button works: determine here whether the customer is given the choice to go directly to the offer page when clicking the offer button or whether a pop-up will be shown that gives the choice between 'continue to the offer page' or 'continue shopping'.
Activate quote button.
You can activate the quote button under the tab options of the product in question under the heading: "Show order/quote button at product".
Data fields
You can decide for yourself which data the customer has to fill in when requesting a quote. You can set this via "Starting point > My Webshop > Settings > Order process & stock > Data fields".
You also have the option to add your own fields at the bottom of the page. If you already installed the quotation app before, this will also contain the (previously required) fields for 'name' and 'email address'. It is advisable to remove these and enable the replacement fields from the quotation column in the data fields.
With the free fields you can choose between 2 types: text field and text area. A text field only allows you to enter a single line of text, while a text area allows you to enter more text. Did you already enter 'name' and 'email address' in the previous installation of the Quotes app? Then these will automatically be converted to a text field. Therefore, we recommend deleting 'name' and 'email address' and using the corresponding data fields in the 'Quotation' column.
Quotation management
Overview
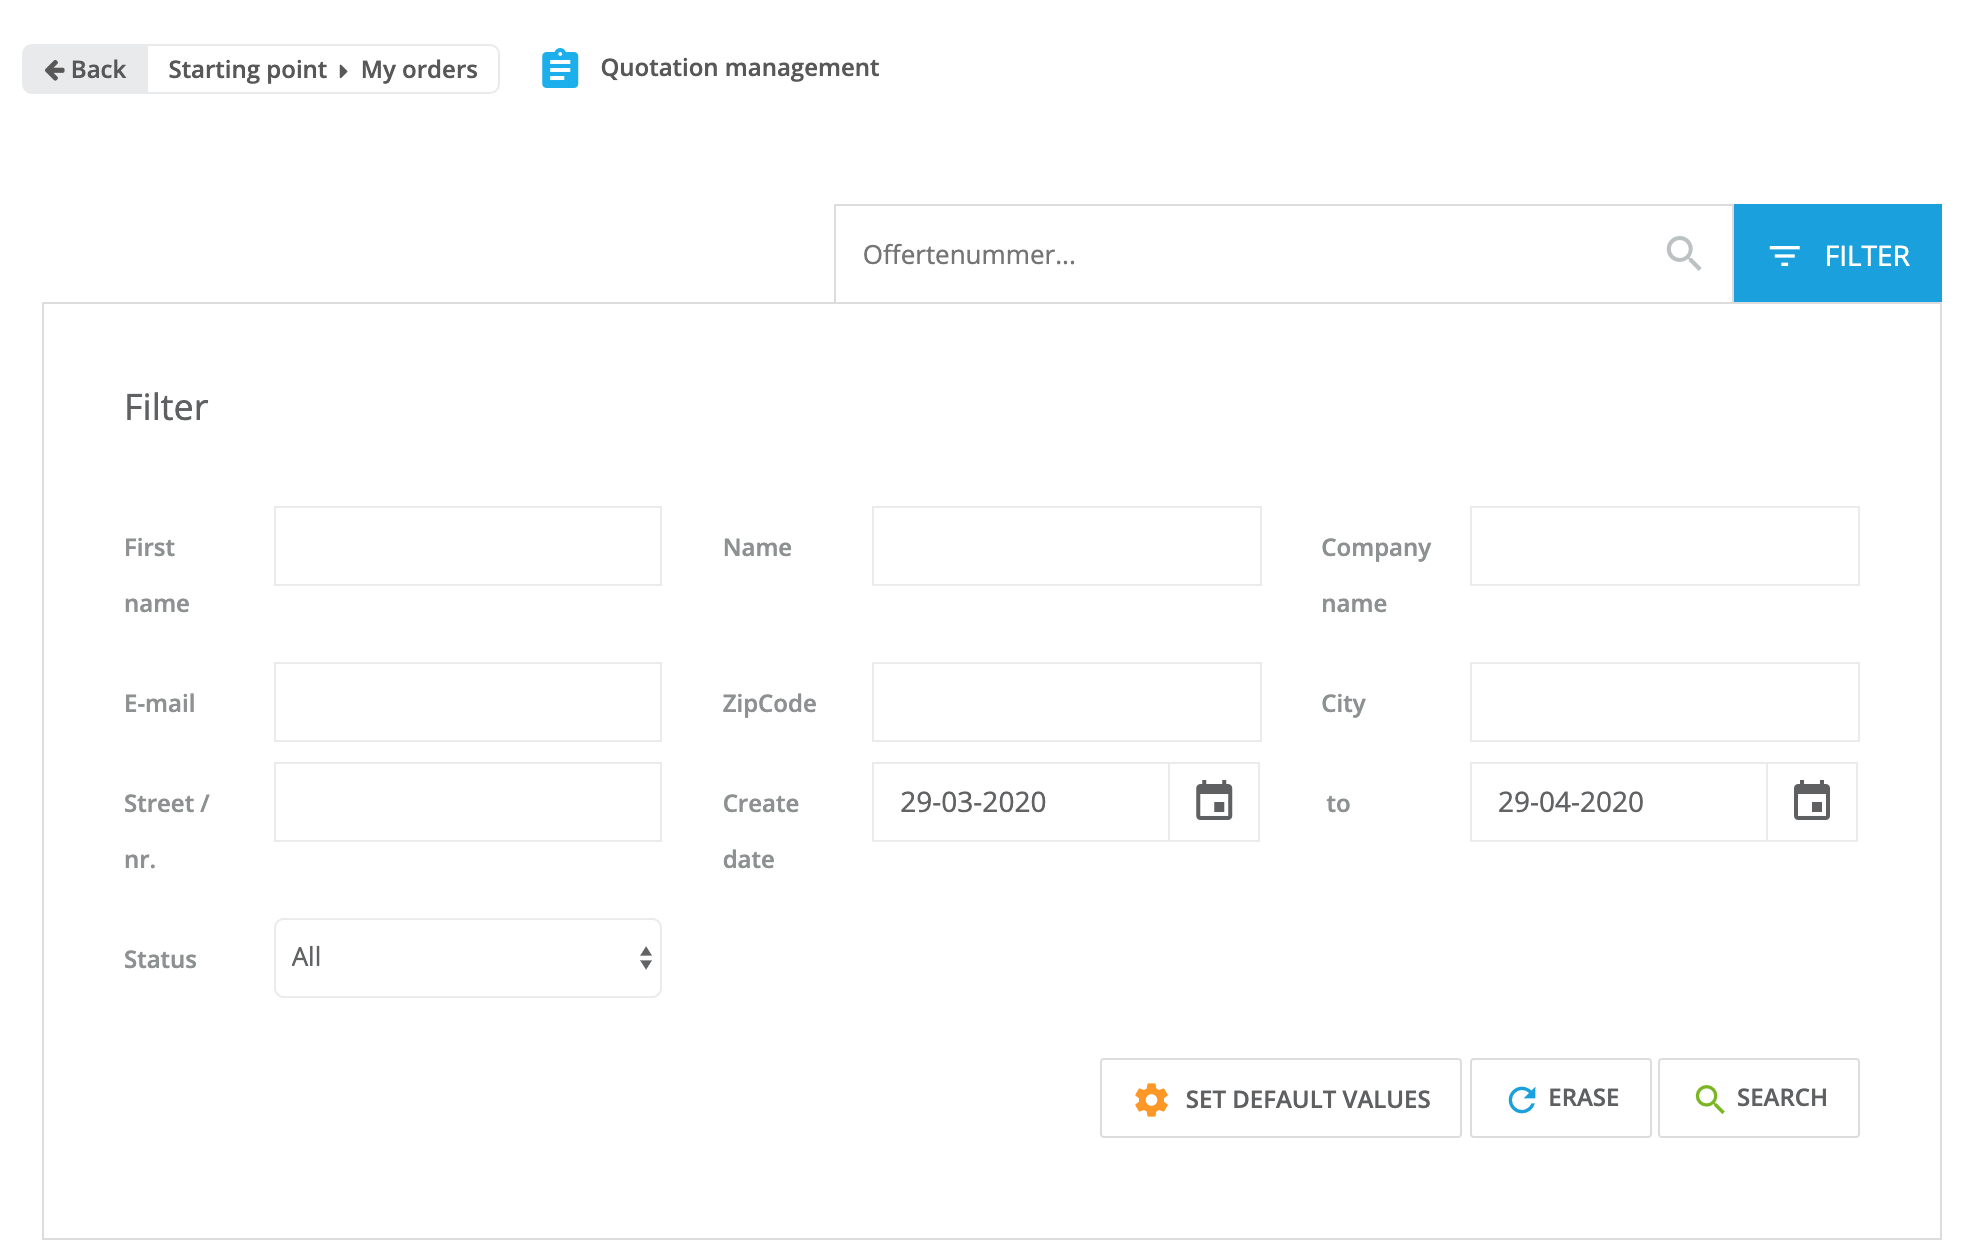
Via "Starting point > My Orders > Quotation management" it is possible to view all quotations. Here you can also search specifically for a particular quotation or filter by fields such as name, date and status. It is also possible to create new quotations from this overview page.
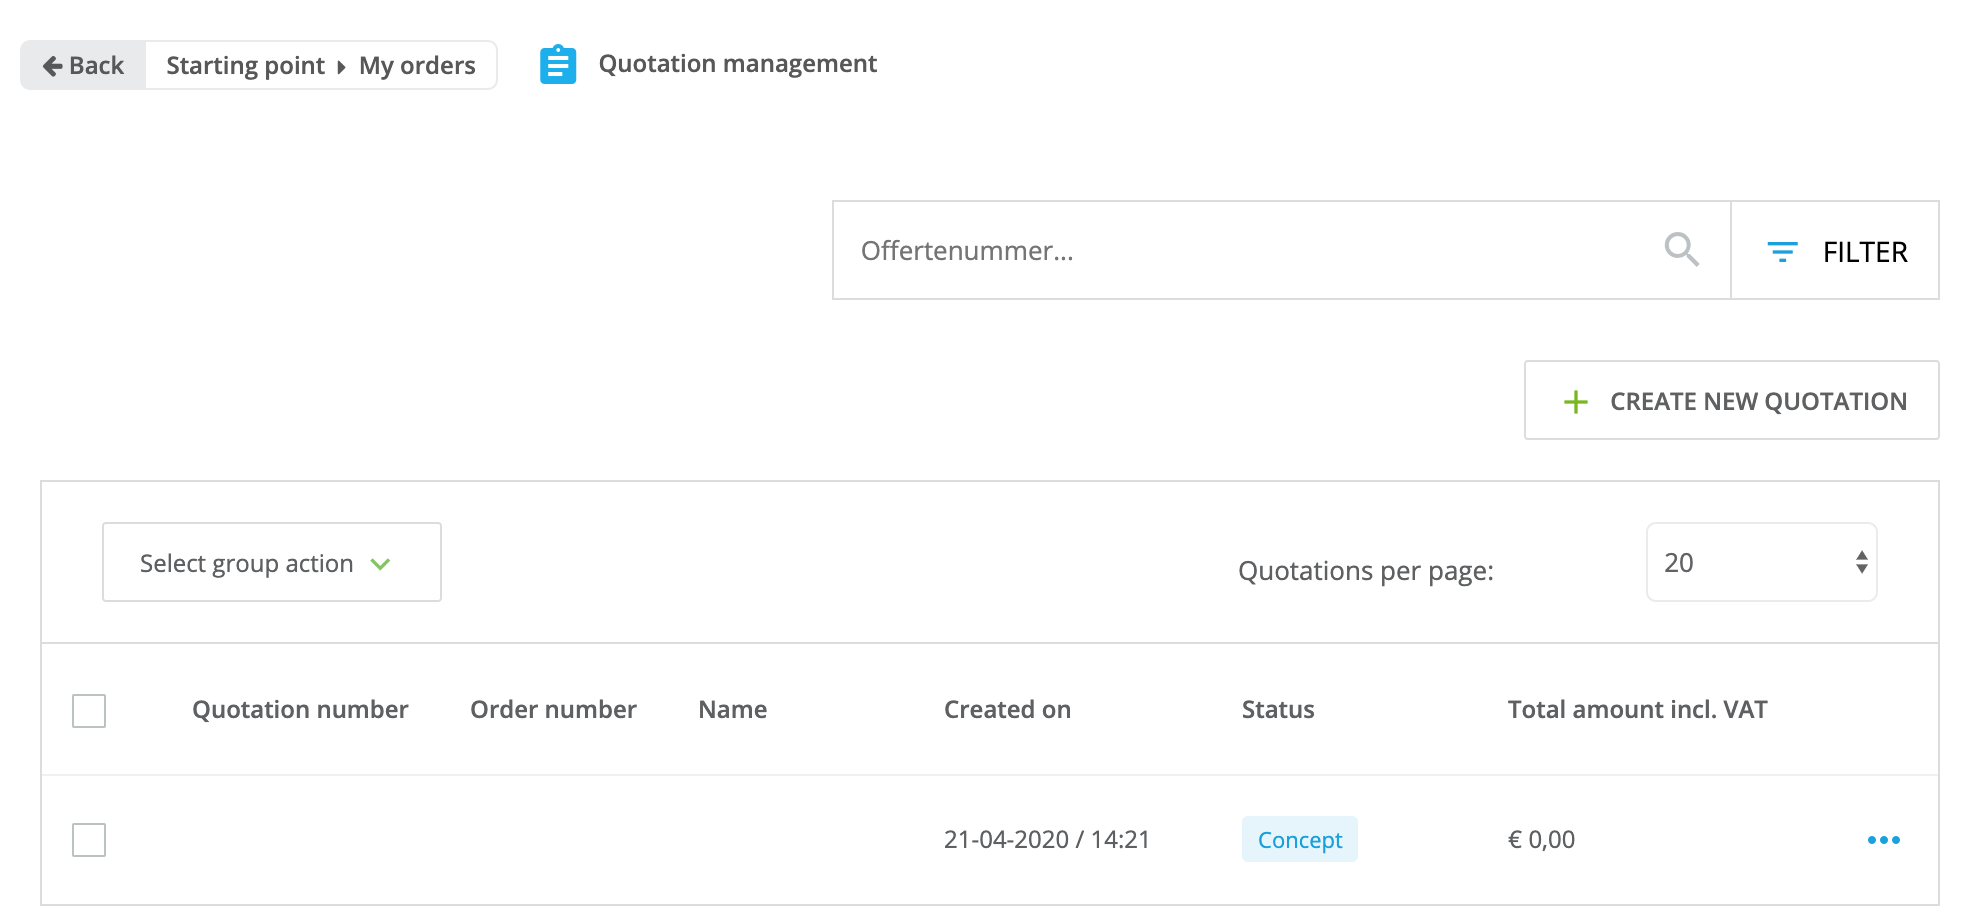
Creating a new quote
By clicking on the "Create new quote" button in the overview, you can manually create a new quote. This works the same as editing an existing quote but does not contain any data or products. These can be added yourself. Are you selling exclusive of VAT? In that case, the quotation will also be shown exclusive of VAT.
View and edit quote
To view and edit the details of a quote, click on the icon in the overview and select "change details". It is also possible to click on the quotation number. You will be taken to the details page of the selected quote. This is divided into three tabs: Personal data, Products and Notes.
Personal data
In this tab, the customer's personal data can be viewed and modified. The fields shown here correspond to the fields shown here: Starting point > My Webshop > Settings > Order process & stock > Data fields.
By means of the button 'customer data' you can fill in the form with existing customer data. A screen will open where you can search in previous orders or customer data. For customer data the app 'Login system' must be installed.
Products
Here the products can be adjusted and added to the quotation. Prices can also be adjusted here.
In addition to the possibility to adjust prices of the quotation lines, it is also possible to specify a final price. Then the discount in combination with the VAT will be calculated for you.
Notes
Here you can view, add and/or delete the notes to a quote. These notes are not visible to the customer.
Filter
You have the possibility to search specifically for an order within the quotation management so that this does not take up much time. Search by name or e-mail address, for example. You can also filter on the status of a quotation: open, requested, sent to customer, accepted by customer.
Send offer
When the quotation is complete, it can be sent to the customer. You do this by clicking on the button "Send quote". The email sent to the customer will contain an overview of the quotation. There is also a link that the customer can use to agree with the quote.
Convert to an order
Once a quotation has been accepted by the customer, it can easily be converted from the quotation management into an order. To convert a quotation, select the order and click on "Edit details". This will take you to the details page of the quotation where you will find the button "Convert to order" in the top right corner. If you click on "Convert to order" you will see the following pop-up:
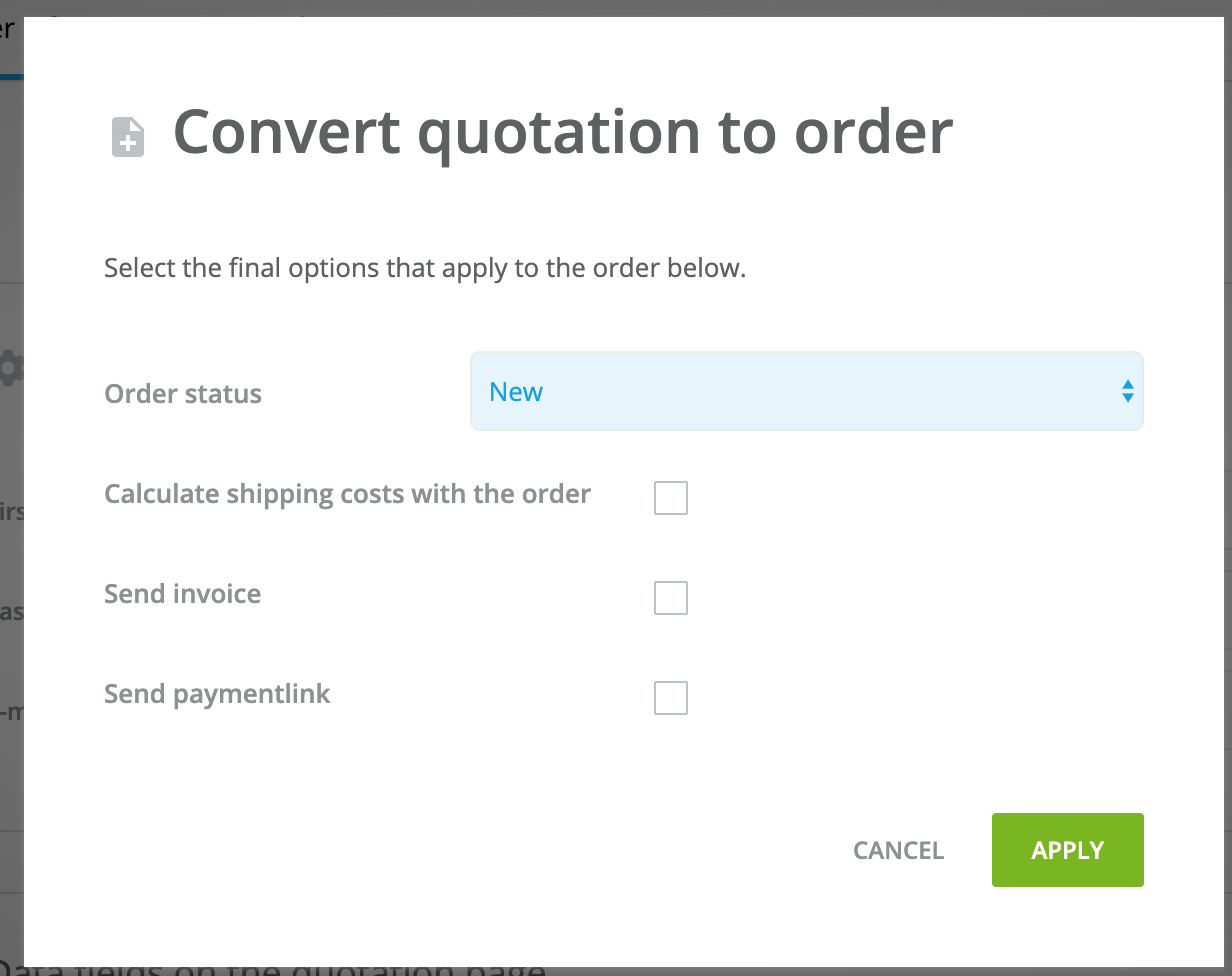
Here you can enter the status of the order, or indicate that an invoice has been sent to the customer. In addition, when the app "Payment link" is installed, an email can be sent directly to the customer to pay for the order.
6. How can your customer report a return?
It is also possible for the visitor to return items in the webshop. We have two types of customers within CCV Shop, namely the guest and the user. The guest does not wish to create an account (or this has not been made possible by you as a web shop owner) and the user has created an account in the shop while ordering or earlier. Below we will explain the return to the guest and user:
Guest with a return
For a guest it is of course possible to return an article via the webshop. As a web shop owner you first need to create a modular page with a return element. When the guest comes to the return page he / she will see 2 possibilities to log in. Because a guest does not have an account he / she needs to be able to log in by entering the order number, postcode and house number. In this way the guest can view the order and create a return. This contains a button with 'Create return'. This button is only visible if there are still items that have not yet been returned in the order, but also if the period for the return right has not yet expired. The period on the right of return can be set in the Workflow settings.
User with a return
The user can log in using his/her login details. When the user has done this the user can go to his/her account via the account page. On the left side is a menu that welcomes the user with his / her first name. Below that are the personal menu items such as: my orders, my returns, my quotes and my invoices. It is also possible to re-order an entire order by clicking on the "Reorder" button. Through an order the customer can create a return. This contains a button with 'Return order'. This button is only visible if there are still items that have not yet been returned in that order, but also if the term on the return right has not yet expired. The period on the right of return can be set in the Workflow settings.
Returns page
When the user has clicked on the button to create a return the user will be redirected to a new return page. Arriving at the page a pop-up appears in which the products in that order are displayed. The user chooses which and how many products have to be returned and then clicks 'Apply' to add the products to the return form. After this action, the user can still change the products and quantity by clicking on the 'Change' button in the right block (Return details). Then the user goes through three steps:
Step 1:
The user indicates the reason for the return.
Step 2:
The user checks if the delivery address matches and changes the delivery address if it is not correct.
Step 3:
Step 3 shows the address and contact details of the web shop owner. The user can use this information to send the returns and to be able to contact you if necessary. There are also frequently asked questions that you can link through the maintenance of your webshop. You first need to create a FAQ page and based on category you can then link the correct FAQ category to the returns page (My Webshop-> Settings -> Order process & stock -> Workflow -> tab: Returns).
At this moment we do not support X-Y discount in combination with returns. For example, X-Y discount is to pay 4 fetch 3. Is this really desired? Ask us via Support so we can help you further.
Thank you page
After sending the return form, the user will be put on a thank-you page. You can change the text on this page in the settings via Starting point > My Webshop > Settings > General > Texts. In the settings you have the possibility to change the default text and by means of keys you can determine where the frequently asked questions come from and where the button is placed to create a return label. This can be done via: Starting point > My Webshop > Settings > Order process and stock > Workflow > Returns tab.
Comments
0 comments
Please sign in to leave a comment.